Diane's blog


pc-table-runner-finished3-wmtest

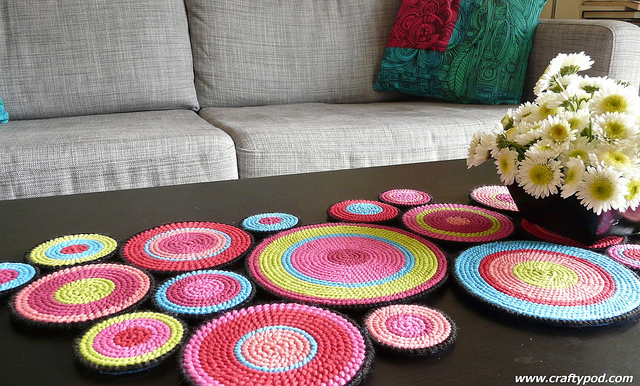
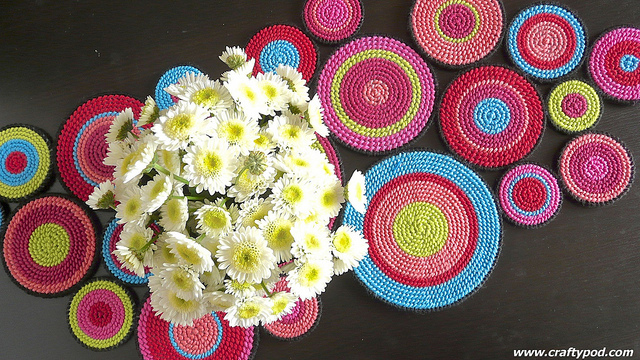
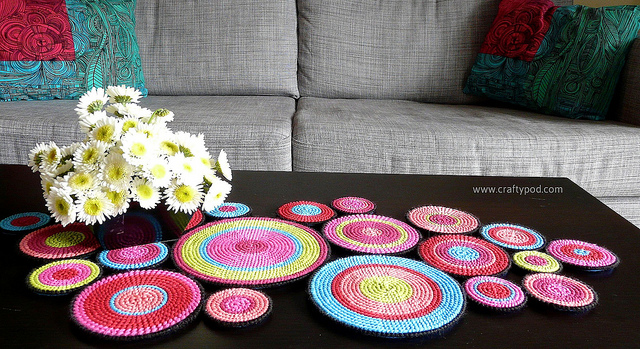
Most big-box craft stores carry these intriguing PC circles, and they're handy for lots of projects. I love this table runner for its free-formness. All you need to do is stitch up a bunch of circles, and then put them together in any configuration you like – you could make a more circular arrangement for a round table. You could make a longer and thinner one for a credenza. See my point?
pc-table-runner01

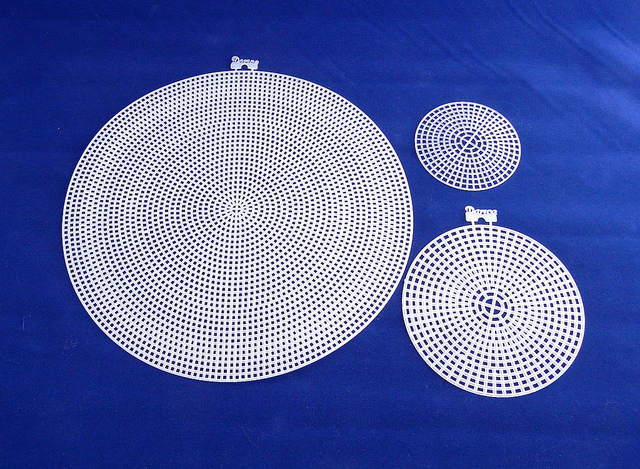
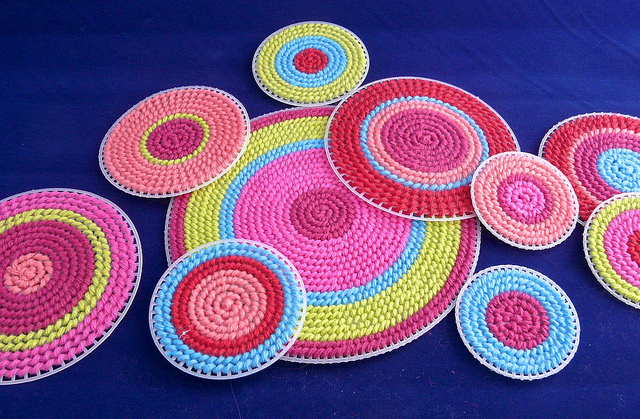
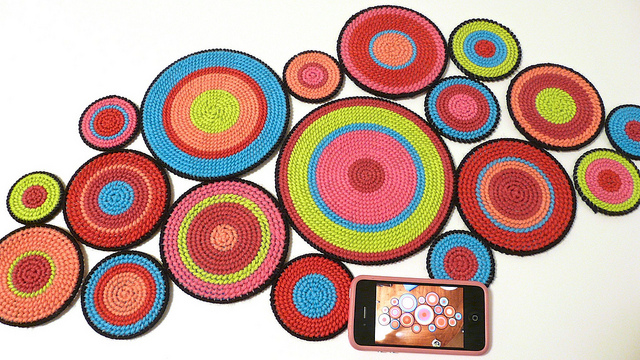
These are the widely-available circles sizes: 6", 4.5", and 3". You may notice that my table runner seems to have lots more sizes than these in it – that's because I cut some of my circles down a bit to create more variety. (All you do is cut away the outer rows until you're happy with the size.) I used 21 circles in my table runner; you might need more or fewer than that.

If your local craft stores don't have circles, you can get them online.
pc-table-runner06

Stitching the circles

I stitched my circles with good ol' tent stitch. And my PC tricky-tricks from the wall-hanging project totally apply here, so take a quick look back at that post.

You could really use any decorative needlepoint stitch here, as long as it'll conform to the circular pattern of the holes in the canvas.
pc-table-runner-collage1

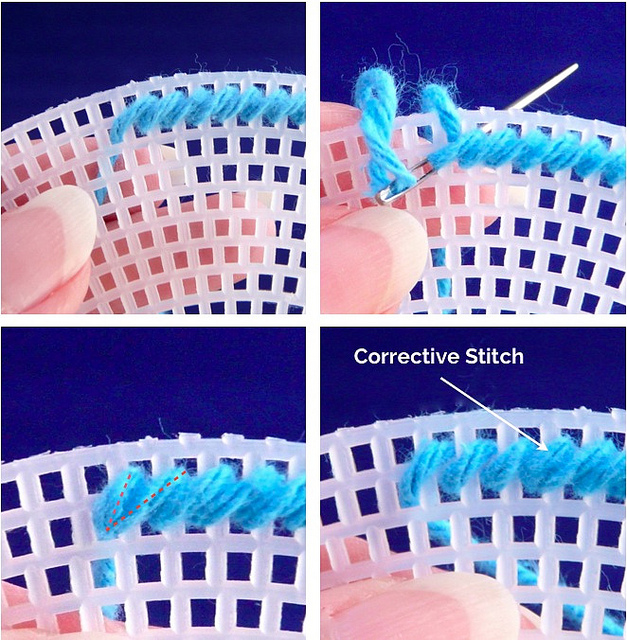
There's one important stitch to know when you're tent-stitching PC circles. Depending on their size, these circles will have places where the holes don't line up perfectly, or where they're a bit larger than normal. That'll sometimes cause your stitches to get too long and too horizontal as your work your way around.

When that happens, simply take what I call a "corrective stitch." That's where you start your stitch in a new hole, but you end it in the same hole as the previous stitch. That corrects the angle, and your stitching will look more normal going forward. You'll need to make more corrective stitches in your rows as you get closer to the center of most circles.
pc-table-runner07

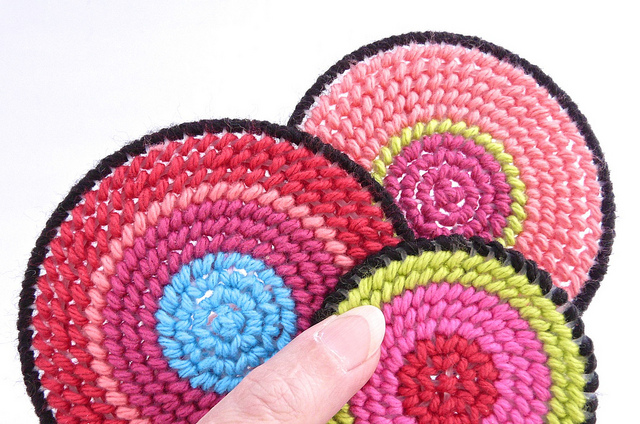
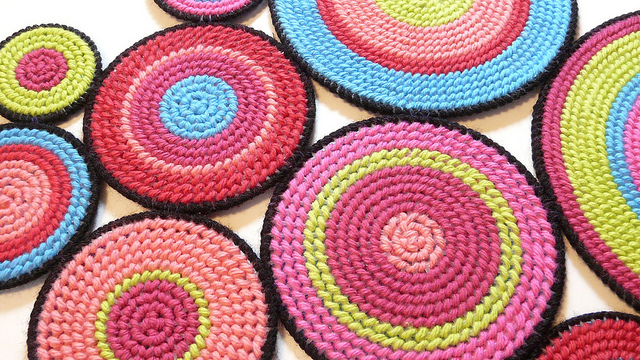
I was pretty loosey-goosey about my color placement as I stitched my circles. I chose six colors of my favorite Sugar 'n Cream. I started at the outer row of each round and stitched toward the center, changing colors when I felt like it. (I do loves me some serendipitous crafting.)

After that, I edged all the circles with overcast stitch. Some circles need two stitches in each hole to get good coverage, and others need only one stitch per hole. That all depends on the size of the circle and where you might have trimmed it.
pc-table-runner08

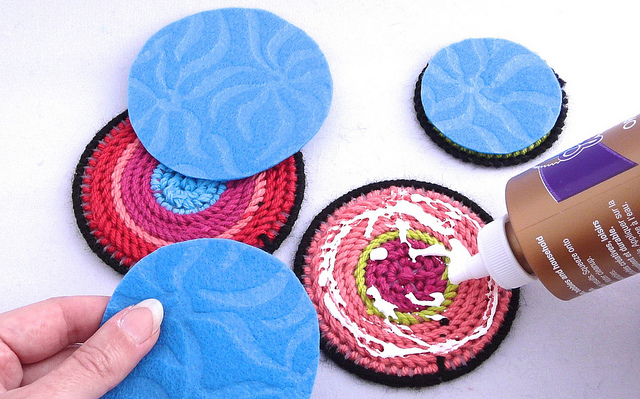
With all the circles stitched and edged, it's time to back them. I just traced each circle onto some felt with a fine-point marker, and then cut them out just inside my tracing line. I then glued the felt circles to the backs of the PC ones, and placed them under some heavy books to dry.

(Pro tip: PC has big openings that allow glue to ooze through. Put some wax paper on both sides of your circles to protect your books and your work surface. You'll thank me.)
pc-table-runner10

Then I spread my finished circles out on a table and moved them around until I had a configuration I liked. I highly recommend taking a photo of that layout – you'll need that to refer back to again and again as you join these puppies together. (Seriously, don't skip this step. I always think I'll just remember how I had them placed, and I never, ever do.)
pc-table-runner19

Joining the circles

The next step is to stitch those circles together. It's easiest to do this with your circles all laid out in front of you, and that photo you took earlier close at hand.

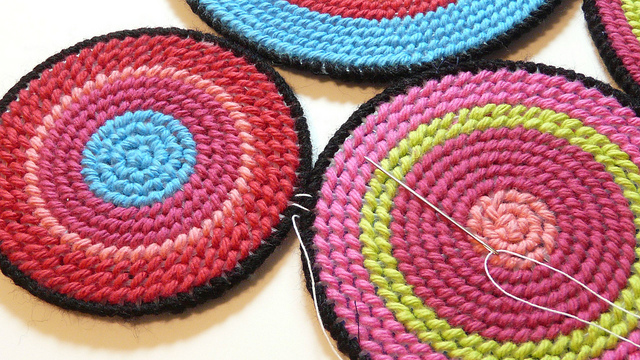
Before we get into process, I'll tell you that the whole secret to a nice, flat table runner is small points of contact. It's tempting, when you're stitching these things together, to stitch along a wide area so that the two circles are totally immobile against each other. That's a mistake! You need your joined circles to be able to "roll" a little to this side or that side - that way, as you keep adding new circles, you'll be able to gently adjust all their positions so they fit together neatly.

By the time you have all the circles joined, trust me – the whole thing will be good and stable.
pc-table-runner14

I recommend using a strong, fairly thick thread for joining your circles. Upholstery thread or quilting thread are good choices. You can also work with a double strand of regular sewing thread, but with doubled thread, there's always a possibility that it'll get tangled as you stitch.

I'll demo the join using a contrasting color of thread, but you'll want to use one that matches your edging.
pc-table-runner-collage2

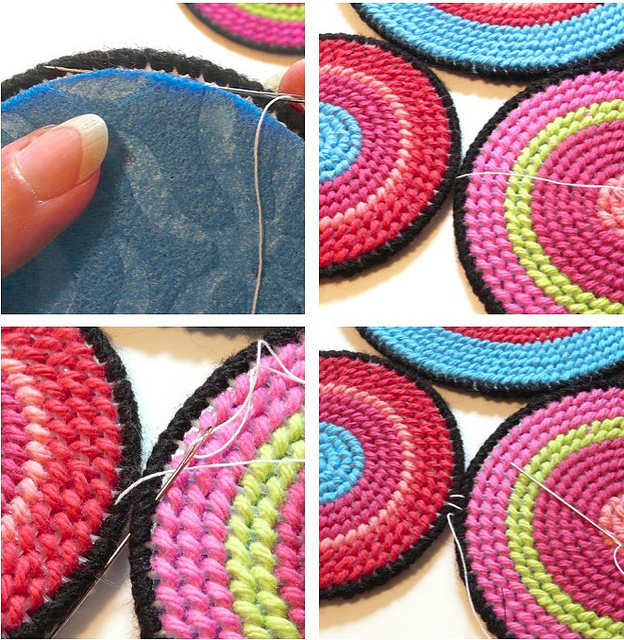
Start joining with one of your larger circles that's near the center of your layout. Thread up a sewing needle with about 12" of thread, and tie a nice big knot in the end. Pass your needle through some stitches at the back of your first circle – all we're doing here is catching that knot in the yarn to anchor it. Pull the needle and thread all the way through.

Set the circle down again, placing it in its location in your layout. Turn this circle so that the thread is coming out right where this circle will connect to the one next to it.

Next, pass your needle down through the edge of that adjacent circle as shown. (It's best to do this pass with the two circles laying flat on the table.)

Repeat this process one more time to get two stitches between the two circles. Now it's okay to pick them up and hold them in your hands. Stitch them together a few more times, pulling the thread fairly tight. Just make each join point is no more than 2-3 holes wide – you can make several stitches in each of those holes for strength, but keep that join point small!
pc-table-runner-collage3

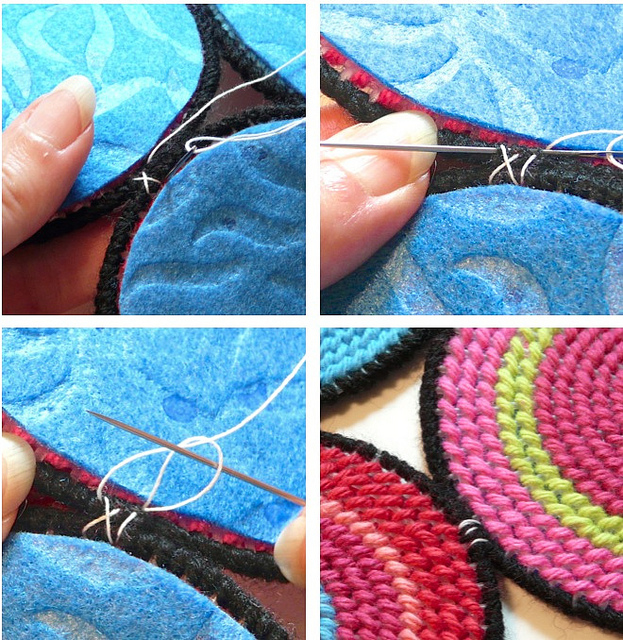
When you're done with those stitches, it's time to make a good, strong knot at the back. Pass your needle under several stitches and pull the thread through until you have a small loop. Then, pass your needle through that loop two times. Pull the thread tight, and you have a knot. Cut your thread and move on to the next join point.

I recommend checking the alignment of all your assembled circles frequently against your photo as you work on this part of the project. Lay your runner back out flat on your table before you join each new circle.
pc-table-runner-finished5-wmtest

When you've joined all your circles, you're done! You might pick up the finished runner in your hands and see if there are any points where the join between two circles feels a bit floppy. You might want to go back and do some more stitching at those points, just to be extra awesome about things.

I think this design would also be pretty rendered in neutral colors, or as neutrals with little pops of color in the centers, or even as a monochromatic kind of thing. What variations will you come up with?
pc-table-runner-finished1-wm

pc-pincushion-needlebook-finished-1 (1)

This project came out of a bad habit of mine. I have a little felt needle book, and I'm always sticking my needles right into its front cover, rather than neatly putting them back in the book. So the poor thing is looking really beat-up with all that stabbing, and every time I need to get a needle out of it, I have to cope with the sharp points of all the needles I stuck through it.

So I decided to make a version with a built-in pincushion. And it occured to me that plastic canvas was a perfect medium! So here's how to make your own...

pc-pincushion-needlebook-01

First, cut your PC into the pieces you'll need. Here, I'm using two 3 1/8" squares of the smaller (10 count) stuff. You can also use the more readily-available 7 count canvas; just cut it somewhere close to that size.

I also cut up a 3" round so I could get a nice ring. I removed the outermost row of squares and the inner section. (A little pair of scissors will let you manuver in there, or you can use an Xacto knife. If any little "nubbins" are left sticking out at the edges, cut 'em with toenail clippers.)

pc-pincushion-needlebook-02

Next, stitch your PC any old way you like. For the front and back cover, I used cross stitch, alternating two colors, and using full strands of six-strand embroidery floss. You can really use any stitch pattern you like. Just leave a big opening in the center of the front - I'll explain in a moment.

For the ring, I just used regular old tent stitch all the way around. Since this piece is made from a larger grade of canvas, I used two strands of that six-strand floss to get good coverage.

...And I finished the edges of all three pieces with overcast stitch.

pc-pincushion-needlebook-03

As you're stitching that front cover piece, keep placing the ring over it to make sure you're covering the canvas up to the edges of the ring. But leave the center as is.

pc-pincushion-needlebook-04

With that done, we'll make a pin cushion. Here's what you need:

  • A circle of fabric that's twice the diameter of your PC ring
  • A circle of card stock that's about 1/4" bigger than the inner hole of the ring

pc-pincushion-needlebook-05

We'll make a yo-yo from the fabric circle. Fold 1/4" over to the wrong side and make a running stitch with a needle and thread. If you'd like to go deeper into yo-yo-making, this is my favorite how-to ever, from Heather Bailey,

pc-pincushion-needlebook-06

When you've folded and stitched all the way around the edge, pull the thread to start gathering the fabric. Adjust the gathers so they're fairly equal all the way around. Then pop in a wad of fiberfill about the size of a kiwi fruit. Or a small lime. Eat what you like.

pc-pincushion-needlebook-07

Slip that card stock circle in on top of the fiberfill. Pull the thread a bit more so the yo-yo is lightly snug around the card stock. Don't knot or cut your thread just yet.

pc-pincushion-needlebook-08

Pop the pin cushion into the ring now. From here, you may want to do a little adjusting. You may want to move the gathers in the fabric around to minimize any big creases. You may also decide to open the back of the yo-yo and slip in a little more fiberfill. Basically, just fuss with the thing until you like the look of it, and then go ahead and knot and cut your thread at the back of the pin cushion.

pc-pincushion-needlebook-09

Now, sew around the edge of the pin cushion at the back, anchoring the fabric to the back of your PC stitching. This stitching will be 100% hidden, so don't worry about being too fancy – just catch a little fabric and a little floss in each stitch.

pc-pincushion-needlebook-10

When that's done, the bottom of your pin cushion should be reasonably flat, like this. If it isn't, push your thumbs up into it to flatten it.

pc-pincushion-needlebook-11

Pop that pin cushion onto the front of your needle book, and use a few Wonder Clips (handiest supply known to man) to keep it centered.

pc-pincushion-needlebook-12

pc-pincushion-needlebook-13

Attach the two pieces together using a back stitch that goes around the ring, just inside the outer edge. I used a single strand of pearl cotton for this part, but you can use a six-strand strand, too. It'll just be thicker.

You can stitch right through both layers of PC, but you may have to feel around a little for where the holes match up.

pc-pincushion-needlebook-14

Now, I also back-stitched around the inner edge of the ring – but this row is considerably less fun, because you're also stitching through the edge of that card stock in there. Switching from a dull-pointed needlepoint needle to a sharp-pointed crewel needle helps, but even so - you can really consider this step more of an anal-retentive nicety, and totally skip it. :-)

pc-pincushion-needlebook-15

OK, so let's make the inside pages of the needle book now. Cut two pieces of felt just slightly smaller than your two covers placed side-by-side. (So in this case, 3" x 6 1/2".) Sew them together up the center by either hand or machine. Fold the whole thing in half, with that seam on the spine.

pc-pincushion-needlebook-16

Trim the outer edges of the pages a little if you need to. This is the alignment you want them to have with the covers.

pc-pincushion-needlebook-17

We'll assemble the whole thing with craft glue. Put some around the edges of the back cover first. Place your folded felt over that, lining up the edges carefully.

(I glue only the edges so I can insert needles into the center of the glued part later, like this:)

pc-pincushion-needlebook-finished-6

pc-pincushion-needlebook-18

Glue the top cover on in the same manner.

pc-pincushion-needlebook-19

Now, you need to give the whole thing some even pressure while it's drying, so get a glass or jar with a mouth big enough to fit on the top cover. Invert it over your needle book and leave it there until the glue dries.

pc-pincushion-needlebook-finished-3 (1)

And voila! You're done! As you can see, you can vary the amount of stuffing you put into your pin cushion, making it very puffy or not so much. This shot also shows you a different style of cover stitchery.


In case you missed it, there's lots more PC goodness at these blogs:

Kaleidoscope Pillows

I had such a great time coming up with this project for Spoonflower. I've been obsessing lately about kaleidoscopes, and how they create complex images by capturing one wedge-shaped segment and repeating it. I got to thinking, how about recreating that idea in fabrics?

Each pillow requires two fat quarters, and Spoonflower has a bazillion great prints to play with in this way. Go check out the tutorial!

Fall Scarf Tutorial for Spoonflower

OK, so maybe temperatures are in the upper 80's here in PDX this week, but it's still time to get excited about cooler temperatures and scarf-wearing.

I love this Fall scarf I made for Spoonflower. It combines a layer of gauzy voile with a layer of flannel, so it's very lightweight, but still nice and warm. And I hand-quilted around the paisleys, which creates a lovely pattern on the flannel side. Go check out the how-to over on the Spoonflower blog!

Tote Tutorial for Spoonflower
Photoshop wizardry here by Kirby Harris.

I'm thrilled to have another tutorial over at the Spoonflower blog this week! I came up with this one based on how much I love voting in their weekly fabric contests.

Have you ever voted in these things? They're an awesome work distraction. And at the end of voting, you get to see all the fabrics you voted for, and I'm always struck by how nicely they'd all work together in a project.

Tote Tutorial for Spoonflower

...So I came up with this project! You can whip this tote up in just a couple hours, using five test swatches of your favorite Spoonflower fabrics. Go check out the how-to!

spoonflower-placemat-finished-2

I had a complete blast making this tutorial for the Spoonflower blog. They have so many beautiful large-scale prints over there, and I thought it would be fun to play with those in making some giant-size paper piecing.

These fabrics are designed by Holli Zollinger, and you can get more details on them in my tutorial. I had them printed on Spoonflower's Kona Cotton.

Giant Hexie Placemat

...As soon as I finished my photo shoot, K asked, "So, can I eat your snack-model now?"

chenille_flowr_finished_1

It's not like I had the time, really, for another ornament tutorial. But somehow I got all fixated on the idea of chenille stems, and this happened.

Actually, it's a really quick and easy little ornament (not counting glue-dry time). You could use these on your tree, or as garland, or gift tie-ons. You could make a whole mess of them at once, and it's a nice craft for older children, family groups, or holiday craft nights.

Anyway. First you need three 12" chenille stems. Bend them all up according to this handy little video. (Sometimes it's a lot easier to show something in motion than in still photos, you know?)

chenille_flower_04

Once you have three petal units bent, then cut yourself three circles. (I know there are only two pictured here, but bear with me.)

You'll need two circles of fairly stiff cardboard. If you plan to make a two-layer flower, then you'll also need one of regular card stock. My circles here are 1 1/4" in diameter, but that's not like a law or anything.

chenille_flower_05

Get yourself some tacky glue, and put a nice, thick puddle in the center of one of your cardboard circles. Keep it away from the edges, but be pretty generous with it.

chenille_flower_06

Next, place your three petal units into the glue. You'll have plenty of time to arrange them just so while the glue stays wet.

chenille_flower_07

Then, put a little more glue over the center and add the card stock circle. Make sure everything's centered in relation to everything else.

chenille_flower_08

Now, this whole thing needs to go under a heavy stack of books for a while, to press the shape nice and flat. But there's one important key…

chenille_flower_09

…Make sure the weight you place on your flower is balanced. If you're making lots of these ornaments at one time, this won't even be a problem - just spread all the ornaments out under the books.

If you're only making a few at a time, however, you may find that the books can't lay flat over the ornaments - the thickness of the ornaments throws the books off-kilter, like you see above. This will result in off-kilter ornaments!

(Not that this has happened to me or anything.)

chenille_flower_10

…So, just place a little something under all four corners of your books to help them stay nice and parallel to the table top. If you live in a house with thousands of tea bags, like I do, then that's a natural choice. You could also use magazines, or junk mail, or whatever you have on hand.

Leave the books in place for an hour or so while the glue sets.

chenille_flower_11

Then, remove the books and add a second layer of chenille to the top. (How do you get a smaller flower? You just lop off 1/3 to 1/4 of each chenille stem before you bend it into the petal unit.)

chenille_flower_12

Add a little more glue to the center, and then press the other stiff cardboard circle over the top. (Again, make sure things are centered.)

chenille_flower_08

…Then it's back under those books for several hours or overnight.

chenille_flower_13

After that, you can get out all your crafty bits and bobs to decorate the center. I used some scrapbook papers, cut with punches and scissors. I also used some buttons (yay!), ric rac, and sequins. You could also use yarns, felt, pom poms - lots of possibilities!

chenille_flower_03

Lordy, these are fun and addictive to make!

And if you make some, I'd love it if you shared a photo in the CraftyPod Reader Projects Flickr Group!

Pages