Diane's blog


oshie_ornament_finished_3

I got the inspiration for these ornaments a couple years back, when I saw this post on Zakka Life. I was also inspired by Oshie, an old Japanese craft in which you use small pieces of silk and paper to make padded shapes, which fit together into a particular images. You can see some stunning examples here.

My version is greatly simplified from the traditional craft, but I love the tailored quality these things have! And, due to the whole Kanzashi thing, I have vast stores of tiny fabric scraps. This project is an excellent way to use those up.

oshie_ornament_01

So, wanna make one? Here we go. First, you'll need some thick, fairly rigid cardboard. Thick chipboard or mat board work well here. Corrugated isn't a good choice - it can bend too easily.

I made you guys a downloadable set of four design templates, so feel free to use those or make up your own design. To get started, trace your shape onto the cardboard two times. See the dividing lines on the shape? Transfer these to the cardboard as well.

oshie_ornament_02

Carefully cut them out, making sure you don't bend the cardboard in the process. The easiest way to prevent bending is to always cut in to corners, not around them.

(If you wanted to be fancier than me, you could also cut your shapes out with a craft knife and ruler.)

oshie_ornament_03

Cut one of the two shapes into sections along those dividing lines. Leave the other intact. And then, number the sections identically on each shape, as you see here. This will help you keep everything in the right order later on.

That may seem like a silly idea with this tree shape - after all, it's pretty clear which part is which. But with a shape where all the pieces are nearly identical, this numbering scheme makes a huge difference.)

oshie_ornament_04

OK, now to "upholster" each of these pieces. Start with the cut-apart sections. Trace one onto a sheet of craft foam. (You can get this stuff in the kids' section of most craft stores. One sheet will make a lot of ornaments.)

oshie_ornament_05

It's important that the craft foam be exactly the same size as the cardboard. So stack the two together, and if your foam sticks out at the edges anywhere, like it's doing here, trim away the excess.

oshie_ornament_06

Now it's time for fabric. Cut a piece that's about 1/2" larger on all sides than the cardboard/foam pieces. You don't have to be super-precise about it, as long as there's roughly 1/2" on all sides.

oshie_ornament_07

You'll need some masking tape for the next step. (Good old masking tape!) Cut yourself a whole bunch of little pieces, and spread them out where you can grab them easily. I usually take about a 3" strip off my roll, cut it in half lengthwise, and then snip each half into a bunch of smaller tabs. You'll need some larger and some smaller, like you see here.

Also, place your fabric piece face down. Center the craft foam over that, and center the cardboard over the craft foam.

oshie_ornament_08

Begin the "upholstery" process at the corners. Gently stretch the fabric over one corner of the cardboard - be careful not to pull the fabric so tight that you bend the cardboard. Tape the fabric to the cardboard with the masking tape, burnishing it down firmly with your fingers.

I like to pull all the corners to the back first and tape them down. That gives you nice, smooth fabric coverage.

oshie_ornament_09

With the corners down, then pull the fabric around the sides of the shape and tape it down wherever needed. Some shapes need a lot of tape, and some don't. Just make sure that you're getting the fabric pulled nice and smooth over the front of the shape.

oshie_ornament_11

When you're done, you should have something that looks like this. Be careful not to let the tape wrap up over the sides of the shape - you'll want all the tape hidden.

oshie_ornament_12

Just a quick note: some shapes will have sharper corners, like this one. Occasionally, you may need to trim away a little excess fabric in order to tape it down smoothly. And, if you're taping in tight spaces like this, keep plenty of smaller tabs of tape on hand.

oshie_ornament_13

Repeat this process to "upholster" the remaining pieces. (I have no idea why I feel so compelled to put that word in quotation marks.) As you work, keep these pieces laid out in their numeric order, so you know which ones go where.

Next, cut another piece of fabric that's 1/2" larger than the intact piece on all sides, as you see here. You'll follow the same process to stretch and tape this fabric around the cardboard. Wherever you have an inward-facing corner, like you see at the tree trunk above, clip into the fabric a little.

(Just to clarify a point: this backing piece doesn't have any foam padding. You're just covering the cardboard with fabric.)

oshie_ornament_14

With your fronts and back all covered, it's time to assemble the ornament. Place the back piece with its fabric side down. Then, put some tacky glue on the back of each "upholstered" piece, and then place it on its correct section of the back piece.

oshie_ornament_16

When you glue the topmost piece down, slip in a little folded piece of 1/4" wide ribbon. That acts as a hanger. (Or, if you have no ribbon, use some yarn or a bent piece of wire.)

oshie_ornament_15

When you have the whole thing assembled, it's time to put it under a stack of heavy books to dry. (The pressure will make all the pieces lie nice and flat.) If you have a little glue oozing out at the sides, like you see here. wipe it away with your fingers before you put any books over it.

oshie_ornament_17

Leave your ornament under those books for a few hours or overnight. And you're done!

There are so many cool ways to interpret this project. I love using fabrics with metallic accents, because they look a lot like Japanese washi paper.

oshie_ornament_finished_1

Here's one where I "fussy-cut" my fabric to take better advantage of the leaf design.

oshie_ornament_finished_2

…And here's one covered with some beautiful dyed silk Pat sent me. It has such a pretty luster to it.

(Incidentally, the wreath is probably the most challenging shape of the four I designed, due to all the curved edges. I'd recommend making one of the other shapes first. Also, if you make a wreath, I recommend not cutting two identical cardboard shapes at first. Instead, cut one out, cut it into sections and "upholster" it, and then re-assemble them. Trace around this re-assembled wreath to get your backing piece.)

oshie_ornament_finished_4

If you make one of these, I'd love to see! Will you post a photo to the CraftyPod Reader Projects Flickr Group?

little_pc_house_22

Yup, I'm pretty excited about this tutorial. Because I want you all to experience the wonder that is plastic canvas, I figured out a very simple way to make this tiny gingerbread house. It's about 2" square, and just as cute as it can be.

If you're new to plastic canvas (heh heh), you might take a gander at this past tutorial and this one to glean some basics on handling your canvas and yarn.

needlepoint_box18

So, if you've been reading this blog for any length of time, you've likely seen this photo. For this project, I'm using 10-count plastic canvas – the stuff in the middle. You can also use 7-count, but your house will end up larger.

(If you can't find the 10-count in your local craft store, you can also get it online.)

little_pc_house_01

I don't want you to get too hung up on making a formal pattern here. I'll show you the pieces you need to cut, and you can decide on the final size. I usually cut my front/back piece first, and then use it as a measuring guide for the rest of my pieces.

You can draw cutting lines on your canvas with a fine-point Sharpie, or just cut freehand. One sheet of canvas will make a handful of these ornaments.

The only crucial bit is that your front/back piece needs to be an odd number of squares wide. That's so you can form a peak at the center, like you see here.

little_pc_house_02

My side pieces are the same height as the front/back walls (minus the peaked roof part), and as long as I want my house to be.

For the roof, I take the length of the side wall and add two squares, so my roof hangs over a bit.

little_pc_house_03

Once you have all seven pieces cut, then it's time to stitch 'em! I'm using good old Continental Stitch here, and two strands of pearl cotton embroidery floss. For this size canvas, I like a crewel embroidery needle, even though it's sharp and needlepoint needles are usually dull. This size fits through the canvas holes nicely.

I'm pretty informal about it, though – I don't work in rows. I just fill in the most important details first, and then fill in around them.

So, for the house front, I first stitched in the door where I wanted it, and then filled in the brown. (If your door is an odd number of stitches wide, you can give it a curved top like this.)

little_pc_house_05

Now, on the side walls (and the back), I left some areas un-stitched. These spots are where I'll put some tiny shutters in a moment.

(Again, I stitched this informally, filling in the outline first, then figuing out where I wanted those pink windows to be, and then filling in around the shutter spaces. Longtime needlepointers may find this method rather gauche, but it works for me.)

little_pc_house_08

Here are my little shutters, which are just three squares wide. I stitched their centers, and then covered all the edges with overcast stitch.

You can glue them right to the base pieces with tacky glue, being careful not to let excess glue ooze through and stick your project to the table. (Not that this has happened to me or anything.) Give the glue an hour or so to dry before you proceed with the rest of the project.

little_pc_house_07

So why am I leaving un-stitched areas to glue these things to? Well, plastic canvas, once stitched, is pretty thick. By leaving the space under the shutters unstitched, I'm creating a little recessed area. That makes the whole thing nice and flat when it's glued together.

little_pc_house_04

You can stitch up your roof pieces in any design you like. Set these aside for the moment, because we're going to assemble our little house first.

little_pc_house_12

Here are all the pieces we'll be assembling first. Lay them out in this configuration, with the base in the center.

little_pc_house_13

We'll be joining these pieces with a whip stitch. First, you'll sew the bottom edge of each front, back, and side piece to the base piece.

If you have a long enough strand of floss, you can do all four seams as one continuous seam that travels around the square. (Does that make sense? The next photo might help.)

little_pc_house_14

Here's what that looks like when you're done.

little_pc_house_15

Then, you just fold up the walls and whip stitch at the four corners. Here's where things can get a little fiddly in places….

little_pc_house_16

To end a seam, you'll pass your needle under the back of some nearby stitches and then cut the floss. Sometimes, manouvering through these stitches will be challenging. Two important tricks to remember:

  • You can always pass your needle right out through the wall of the house if you need to.
  • Needle-nose pliers really help push or pull the needle through tight spaces.

little_pc_house_10

Anyway. Now we'll add the roof, which is way easier. Just whip stitch the two pieces together in the center and then finish the edges with overcast stitch.

little_pc_house_17

Now, bust out your tacky glue again and put a fairly generous bead along the entire roof line.

little_pc_house_18

Then, press the roof in place. If any excess glue oozes out, don't worry too much - we'll cover up this join in a minute.

Press the roof down for a minute or so while the glue sets, and then leave it to dry for an hour or so.

little_pc_house_19

You can, of course, needlepoint all the decorations into your house, but I thought it would be much simpler to glue them on. So I dug into my Bag of Assorted Sparklies. (Tweezers make tiny sequin-handling so much easier.)

little_pc_house_20

Then I grabbed out some tiny ric rac and glued a strand over the point where I glued on the roof. You only need to do this at the front and back - the sides won't show at all.

I just cut the strand a little too long, as you see here, and then glued it in place. When the glue dried, I cut away the excess.

little_pc_house_21

And if you want to add a hanger, just take a stitch through the peak of the roof at the center, and knot the floss in a loop.

If you make one of these, I'd love to see! Will you add it to the CraftyPod Reader Projects Flickr Group?

thanks_card_20

You can make one of these quilted cards for every person at your Thanksgiving table. You can write each of them a personal message (on the back), thanking them for something nice they've done for you. Or, you can make each person several blank cards, and they can send thank-yous to people in their lives.

thanks_card_22

Before we get into how to make 'em, here's another shot that shows the back. I also love this project because it's a great way to play with quilting without having to wrangle a whole quilt!

thanks_card_01

So, the basis of this card is Friendly Felt, which is a stiffened acrylic felt made from recycled fiber. I love it because it's lightweight and just rigid enough, and you can sew through it with ease. I routinely find this in the kids' section of my local Jo-Ann store, and you can also get it online (try a search on Etsy).

If you don't have access to Friendly Felt, you could also use lightweight chipboard, though the sewing may be tougher going.

Anyway. Cut a piece of Friendly Felt to the size you want your card to be. Here, I'm sizing mine to some envelopes I have in stash - 6 1/2" x 4 1/2". (The card will "grow" in thickness, so make sure it's 1/4" smaller on all sides than your envelope. Or, skip the envelope.)

thanks_card_02

Next, you'll want to play with some fabrics and decide on a patchwork configuration. I did a really simple combination of one print fabric and one linen fabric, but you could do all kinds of different things here.

thanks_card_03

You'll need to end up with a patchwork piece that's about 1" bigger on all sides than your Friendly Felt piece. While you're here, cut a piece of cotton quilt batting that's the same size as the Friendly Felt.

thanks_card_04

Next, stack everything up in this order: your patchwork, face down, on the bottom; the batting centered over it; and the Friendly Felt centered over the batting.

thanks_card_05

Incidentally, you can pin these layers together - just use long pins and pin shallowly so you don't warp the Friendly Felt. With the design I'm doing here, I like to pin things so I can keep that one seam in my patchwork parallel to the edges of the card.

thanks_card_06

So let's anchor these layers together. Head to your sewing machine and "stitch in the ditch" right along that seam line. (If your patchwork is more complex than mine, you'll probably want to sew along all your seam lines.)

thanks_card_07

Now, head over to the ironing board and press all four corners to the back, as shown here.

thanks_card_08

Then, carefully fold all four edges to the back and press them, too.

Pressing Friendly Felt, by the way, is interesting. I recommend that you always keep a layer of fabric between your hot iron and the Friendly Felt. The felt will actually get quite soft when you apply heat, so be careful not to warp it when it's in that state. It'll quickly cool and get rigid again.

thanks_card_09

With the edges pressed, go ahead and stitch close to all four edges to anchor them in place.

thanks_card_10

You know, if I were a better quilter, I might have made nice, square corners. But since I'm not, I made rounded corners part of my design and moved on with my wonky-quilter life.

thanks_card_11

Now, it's time to start quilting. I'll just mention quickly that there are approximately one bazillion ways you could quilt these cards - you could hand quilt, you can machine quilt, you could embroider them, Sashiko, Trapunto and so on. I decided to quilt a design on the linen that mimics the print of the fabric.

If you like, you can draw your quilting lines onto the card ahead of time with a water-soluble fabric marker. Preferably one that's not on its last legs like this one is.

thanks_card_14

From there, you can pop this back on your sewing machine and quilt away. I like to use two or three colors of thread. For these cards, in addition to the quilted design I did on the linen, I also quilted along parts of the design of the printed fabric.

thanks_card_12

Now, as I do this quilting, I don't start and end my seams by reversing my machine and back-stitching (like you might do in a garment-sewing project). I find that, with so many small seams in a tight space, all that back-stitching looks messy. So instead. I leave thread hanging from the start and end of each seam. Just keep moving the threads out of your way as you work.

thanks_card_13

Here's how I deal with all those hanging threads. First, any threads that are hanging from the inside of the card, I thread them one by one on a needle and pull them to the back side. There, I just trim them to about 2" long. I don't bother knotting them, because they'll be glued in a moment.

thanks_card_15

…And here's where I'm going to cause several accomplished quilters to spill their coffee. Wherever my quilting seams run off the edges of the card, I simply gather them, pull them to the back side, and tape them down with masking tape.

I know, right? Tacky! But the thing is, I spent well over an hour on one prototype, pulling all the edge-threads to the back and carefully knotting them. And the result looked exactly the same as this quicker-and-dirtier method did. So, there you go.

(Keep that masking tape at least 1/4" from the edge of the card, by the way.)

thanks_card_17

Now, cut a piece of card stock to match the size of your nearly-finished card. I made a simple one with my computer's word-processing program, printed it, and cut it out, rounding the corners to match the quilted card.

Then, apply a light coat of tacky glue to the back - and be careful here. Too much glue can cause the card stock to warp and wrinkle.

Apply the card stock to the back of the quilted card…

thanks_card_18

…And quickly place it under a stack of heavy books. (Preferably excellent books like these.)

thanks_card_19

And that's it! Once I had the process down, I was able to turn one of these babies out within 30 minutes. You could do it in less if you did simpler quilting.

If you make some of these, I'd love to see them in the CraftyPod Reader Projects Flickr Pool!

dorset_button_brooch2

So, my iPhoto crashed this week, and in the process of completely reorganizing my bloated photo inventory, I found this little brooch. It's from something I worked on earlier this year, and forgot all about.

But it's actually kinda cute, isnt' it? It would look nice on a knit hat or scarf. Here's the simplest of tutorials for how to make it.

The Harder Part:

1. Make six Dorset buttons, using my tutorial from a while back. You'll need five smaller ones and one larger one.

The Super Easy Part:

2. Arrage the five smaller buttons in a circle, so they all touch at the edges.

3. Glue the larger button over the center of the smaller buttons. Let the glue set.

4. Cut a couple of felt leaves, if you like, and glue them on the back of the flower. Glue a circle of felt over the back as well, to cover up the center.

5. Glue on a pin back. And voila!

dorset_button_brooch1

If you make one, I'd love it if you shared a photo in the CraftyPod Reader Projects Flickr Pool!

pc_pendant_fin2 pc_pendant_fin1

I get thousands of emails each week, begging me to offer more plastic canvas coverage on this blog.

(…Okay, well - perhaps that actually happens only in my mind. But still.)

I've been noodling with these needlepoint pendants lately, and liking both the process and finished product. They make up quickly, and use up odds and ends of embroidery floss. Plastic canvas makes a great base for these, because it adds a "heft" that helps the pieces drape well.

Also, it's plastic canvas.

needlepoint_box18

But not just any old plastic canvas!

I used 10-count PC for this project, which is a different animal from the bigger 7-count stuff you usually see at your local craft store. (In the photo above, it's the stuff in the center. The "count" refers to the number of squares per inch, by the way.) 10-count has a finer finish, which takes very nicely to six-strand or pearl cotton embroidery floss.

If you can't find 10-count canvas locally, you can get it online. It's great stuff! (If you're curious, the canvas on the right is 14-count. I've made little gift boxes with it.)

PC_pendant_01

…So, to begin your pendant, cut two same-size pieces of canvas. You can make them any size and shape you like. You may have a specific needlepoint design in mind - and in that case, you'd want to count the number of squares you'll need as you're cutting the canvas.

Or, you can take my patented lazy approach, and just cut a shape and figure out the needlepoint later.

PC_pendant_02

Then, stitch both pieces. I like to stitch them differently, so my pendants are reversible, but you can also make them identical. I'm using a crewel needle here, because it fits nicely through the canvas holes, and a single strand of pearl cotton. If you're using six-strand floss, just use all six strands.

I'm using good old Continental stitch and just playing with colors, but remember - there are so many interesting needlepoint stitches in the world! These are tiny blank canvases - so have fun!

(Incidentally, if you want to sew buttons or sequins to your pendant, this is the time to do that, too.)

PC_pendant_03

Now, we'll stitch the two pieces together. Place them so the right sides are facing out. Thread your needle with a double strand of floss - it provides better coverage at the edges than a single strand.

Pass the needle up through the top layer of canvas only, as shown.

PC_pendant_04

Pull the needle through until you have about 1" of floss. Lay this between the two pieces of canvas, as shown. Then take your next stitch by passing the needle up through both layers of canvas together.

PC_pendant_05

Repeat this stitch to cover the edges of the canvas. (It's called a whip stitch, by the way.) As you stitch, catch that tail of floss in your stitches, as shown here.

PC_pendant_06

Stitch your way around the pendant. To fully cover each corner, take three stitches in the corner hole.

PC_pendant_07

When you've stitched all the way around the pendant, it's time to finish off your floss. To do this, pass your needle carefully between the two layers of canvas, and back out the side, as shown here.

PC_pendant_08

Use a pair of needle-nose pliers to pull the needle and floss through. Seriously, you'll need the pliers. Unless you possess super-human strength.

PC_pendant_09

Clip the excess floss close to the edge of the pendant.

PC_pendant_10

Get a nice, big jump ring, like a 7mm or 8mm. This is the proper way to open a jump ring - you twist it open a bit.

PC_pendant_11

Carefully feed the jump ring through the canvas - pliers are helpful here, too.

If you want your pendant attached to a chain, you can also feed the chain link onto the jump ring now.

PC_pendant_12

Then, close the jump ring. (Here's how, if you aren't familiar.)

…And you're done!

pc_pendant_fin3

I'm thinking these have some interesting mixed-media possibilities, because you can add buttons and beads easily, or embroider on top of the needlepoint. You could even applique some fabric over the needlepoint. Heck, you could even try stamping or painting over it.

If you make one of these, I'd love to add a photo of it to the CraftyPod Flickr group! Just email me or comment here, won't you?

recycled_notes15

Hoo, boy, this little project came out of nowhere! But before I get to the tutorial, a little background...

recycled_notes01

Here's how I maximize my office paper use: whenever I have paper I've had to print on one side, I fold it in half and use it as scratch paper. I write all my daily to-do lists on these things, and my phone call notes. And usually, there's an untidy pile of these folded sheets on my desk.

...So I thought: "I should come up with some kind of holder for these!"

recycled_notes03

I started looking around for something that would form the basis of this holder, and found a 9x12 cardboard mailer in my re-use pile. Perfect!

recycled_notes04

So first, I wanted to make a pocket, so I could slide the folded sheets into it. I measured the size and drew a cut line on the back of the mailer.

recycled_notes05

...Then I slid a cutting mat into the mailer, so I'd be able to cut only one layer of it. (You could also use a piece of thick cardboard.)

recycled_notes06

With that in place, I used a ruler to cut along the cut line with a utility knife. I used light pressure and passed over the cut several times, so I wouldn't damage any of the rest of the mailer.

recycled_notes07

From there, it was easy to cut down the center of the back of the mailer...

recycled_notes08

...And then cut away the excess parts of the back. Now I had a proper pocket, and the makings of a front cover!

recycled_notes02

I stacked all my folded sheets with the blank side facing out.

recycled_notes09

Then, I slid my stack of paper into the pocket as a gauge, and then drew two parallel lines, about 1/4" apart. These form the spine of this book cover.

recycled_notes10

I gave these lines a good scoring with a bone folder and ruler.

recycled_notes11

...And then folded on the score lines to form the front cover.

recycled_notes12

On the back, then, I traced along the edge, and then on the front, I cut along this traced line. That made the front cover match the back cover.

I really should have applied some hand lotion before shooting this tutorial.

recycled_notes13

All I had to do now was find something good to decorate my cover. Heh! Heh heh heh!

recycled_notes14

...So I just glued my awesome Mexican chromos to the front, back, and inside panels. You could also fuse some fabric to the cover. Or decoupage. Or rubber stamp. Or frankly, any one of a million other decorative techniques.

Now all my lists are tidy, and I can add and remove pages anytime I want. I can even grab the whole shebang and throw it into my bag if I need to take it with me.

Cool, huh?

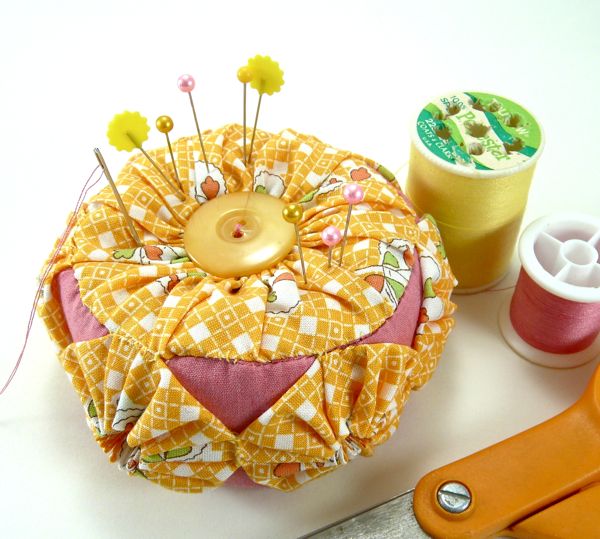
yoyo_pincushion_23

This design showed up in my sketchbook a long time ago, but I resisted making it because I really don't need another pincushion. But I do have a pretty serious yo-yo habit, and finally broke down when I couldn't resist playing with my yo-yo maker any longer.
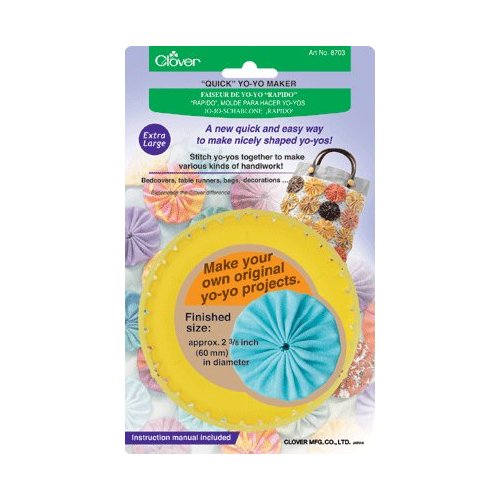
So, this project begins with 6 to 8 yo-yos. I used my beloved Clover Yo-Yo Maker in the 1 3/4" size. If you prefer to kick it old school, then use Heather Bailey's gorgeous tutorial for making them from scratch.
yoyo_pincushion_01

Warning! Math-y Bits!

So, let's figure out some sizing for your pincushion. I promise, being very math-challenged, I've tried to keep this part as painless as possible.

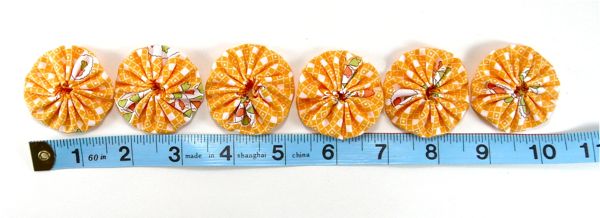
Lay your 6 to 8 yo-yos out side by side, and measure the length of this group, as seen here. You can see that my six 1 3/4" yo-yos measure 10 1/2".
yoyo_pincushion_02

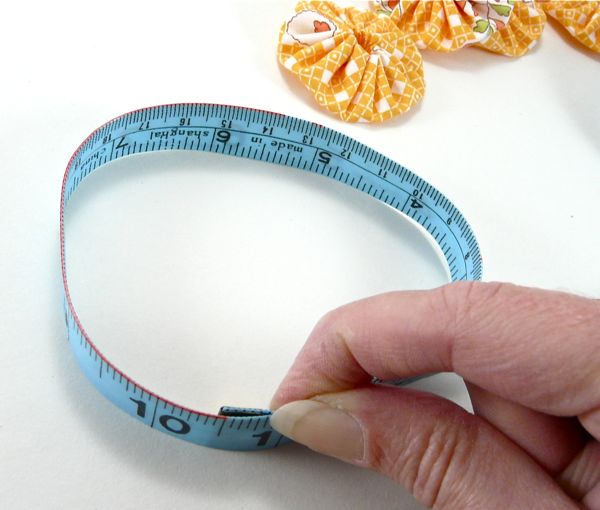
Now all we have to do is take that 10 1/2" and find out what size circle it makes. You could use complicated mathematical formulas for this, but for pete's sake - this is why we have the internet! So go to the Circle Solver Calculator.

The 10 1/2" we measured earlier will be the circumference of our finished pin cushion. So put that number into the calculator and click the magic button. That'll give you the diameter of the finished pincushion - 3.34".

Now, take a deep breath and make some tea. We're nearly done math-ing.
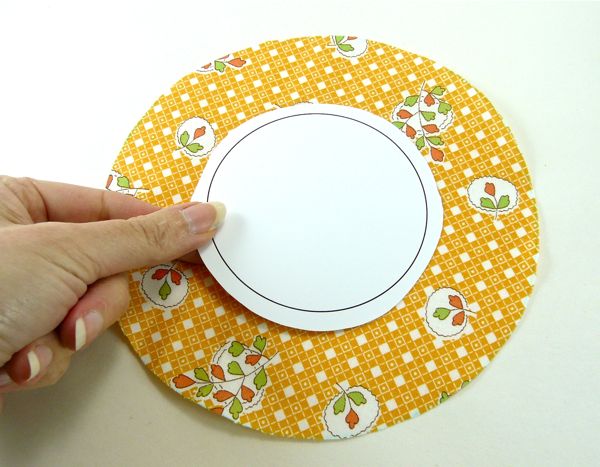
yoyo_pincushion_03

To make my life easier, I popped into my page layout software and drew up a circle with a 3.34" diameter. (You could also draw one by hand.) Then, I added a 1/4" seam allowance all the way around that. (I'll be using this piece as a pattern to make the base pincushion in a moment.)

Next, you're going to need one big yo-yo for the top of your pincushion. In fact, you'll need a yo-yo that's also 3.34" in diameter. To get that, cut a circle of fabric that's twice that diameter, or 6.68".

I used Heather's tutorial to make this big yo-yo.
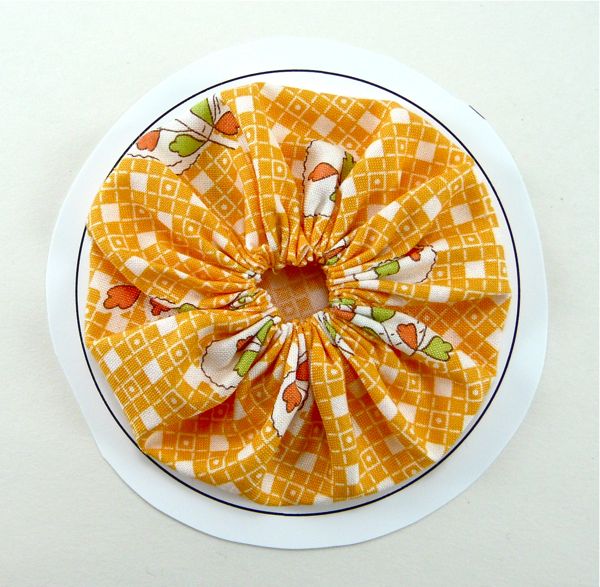
yoyo_pincushion_04

See? When finished, that 6.68" diameter circle makes a 3.34" yo-yo. And here ends the math-y bit!
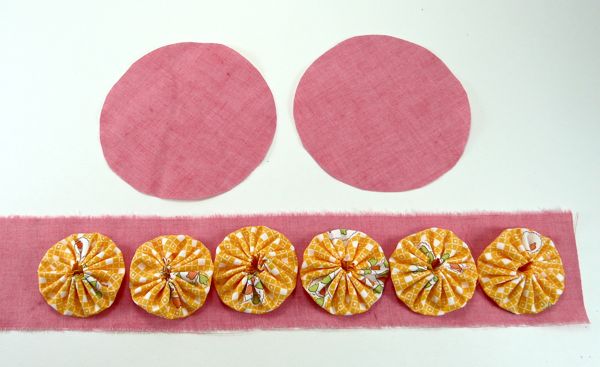
yoyo_pincushion_05

So now, you just need to cut out the pieces for the base pincushion. Use that paper pattern we made earlier to cut two circles - one for the top, and one for the bottom. Then, cut a strip for the sides of the pincushion. It should be 1/2" taller than your yo-yos, to allow for seam allowance. And make it about an inch longer than the length we measured in Step 1.

(For my pincushion, the strip is 2 1/4" tall by 11 1/2" long.)
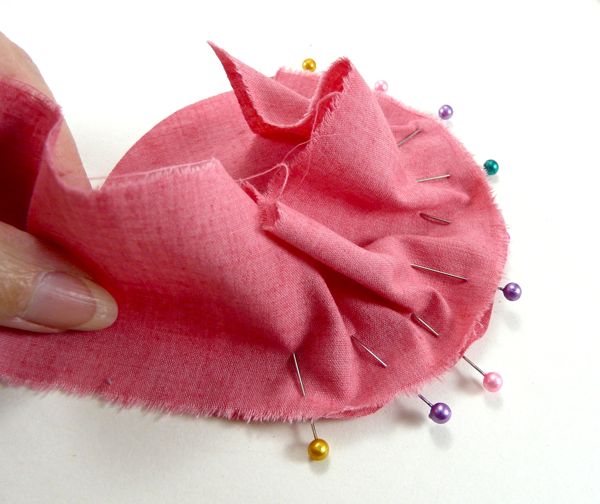
yoyo_pincushion_06

Okay, so let's sew this puppy together! Pin the side strip all the way around the edge of one circle, right sides together.
yoyo_pincushion_07

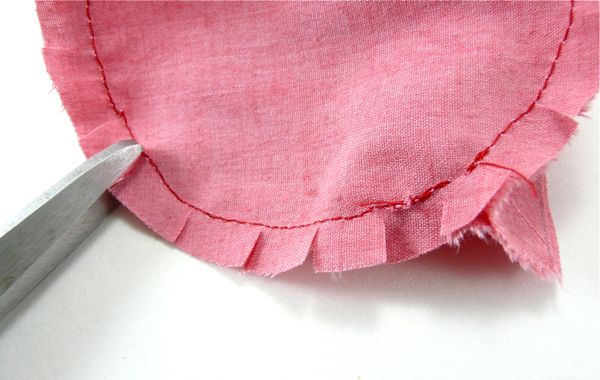
Sew all the way around the circle, using a 1/4" seam allowance. Then, clip into the seam allowance at intervals, like this. (This helps the curved seam keep a nice, round shape.)
yoyo_pincushion_08

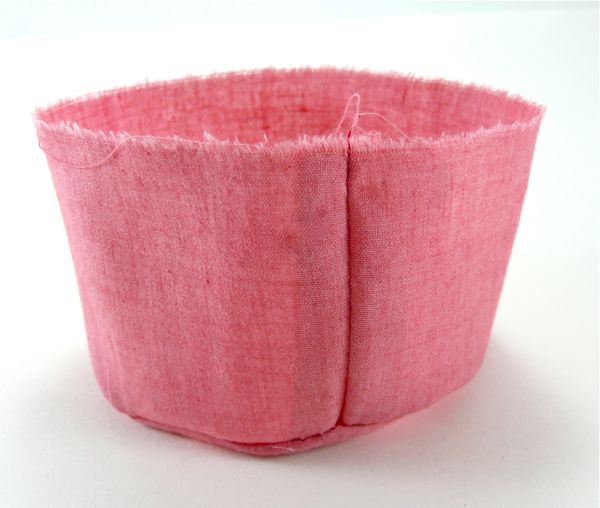
Next, you can sew up that side seam. I added some extra length to the side strip, just to give us some leeway. So, just make the seam wherever the two ends of the fabric meet up against the circle. You want to end up with it looking like this.
yoyo_pincushion_09

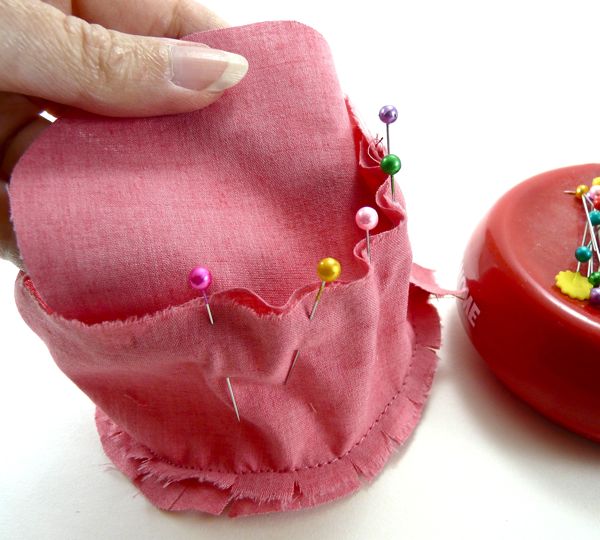
Now, pin the second circle to the top edge of the pincushion.

(Dang, guys - I promise to apply some hand lotion before I shoot my next tutorial.)
yoyo_pincushion_10

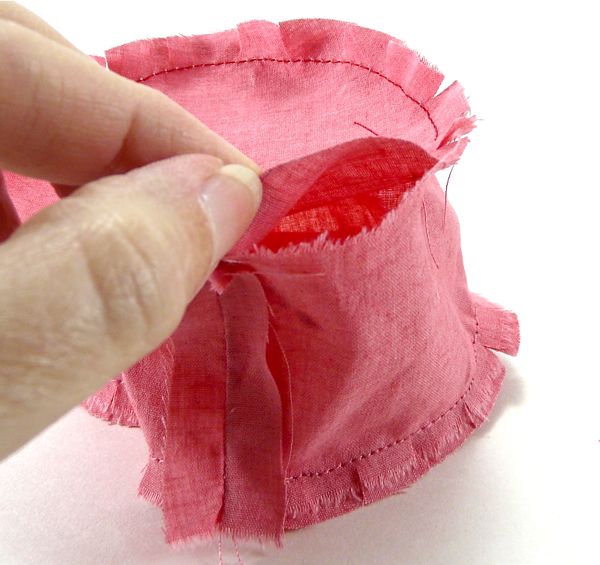
Sew along the edge of this circle, also with a 1/4" seam allowance. Leave about a 2" gap in the seam. Go ahead and clip into the seam allowance as you did before.
yoyo_pincushion_11

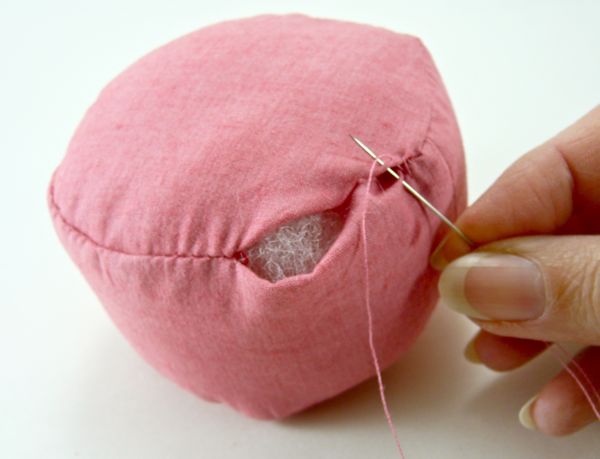
Turn the pincushion right side out and stuff it medium-firmly with some fiberfill. Then hand-sew that opening closed. (It's looking rather cheerful at this point, don't you think?)
yoyo_pincushion_12

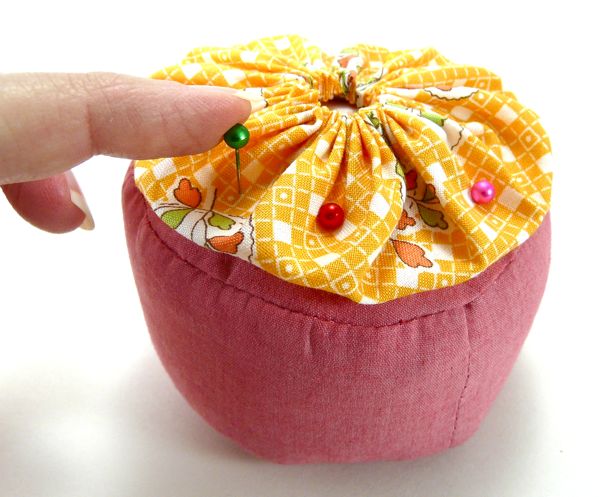
Time to add the yo-yos! Take the big one and place it on top of the pincushion. I like to tack it in place by sticking some pins into it, like this. Just be careful as you're hand-sewing that you don't squeeze the pincushion too tightly, or - ouch!
yoyo_pincushion_13

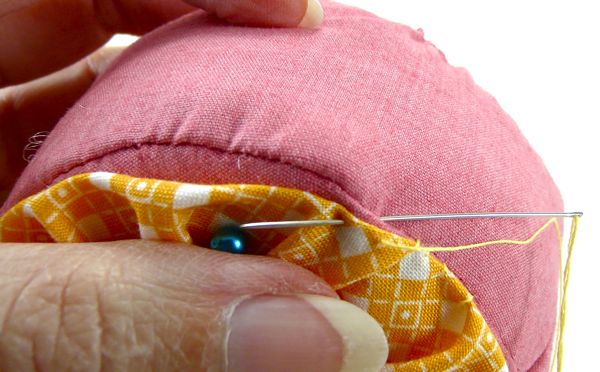
Sew the yo-yo to the pincushion with a tiny whip stitch. I like to use that seam around the edge as my sewing guide.

When you're done sewing, remove all those pins.
yoyo_pincushion_14

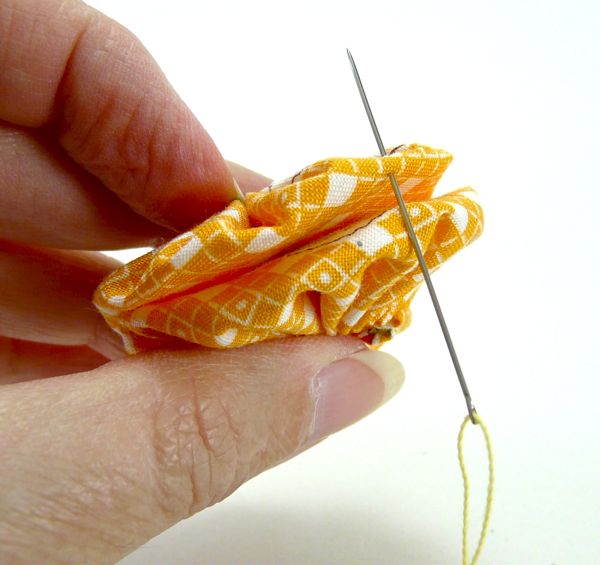
With that done, it's time to join your small yo-yos together in a strip. Place two yo-yos back to back, matching up all the edges. Then, thread a needle with single thread and tie a knot in the end. Pass that needle through the top yo-yo only, as shown here.

(Incidentally, that will hide the knot beneath the yo-yo. Tricky, eh?)
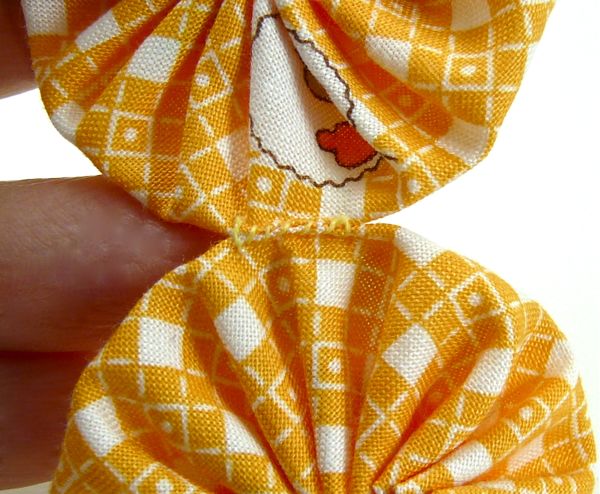
yoyo_pincushion_15

Whip stitch the two yo-yos together, using only about 6 to 8 stitches. Knot the thread at the back.

Repeat this process to join the rest of the yo-yos until they form one long strip.
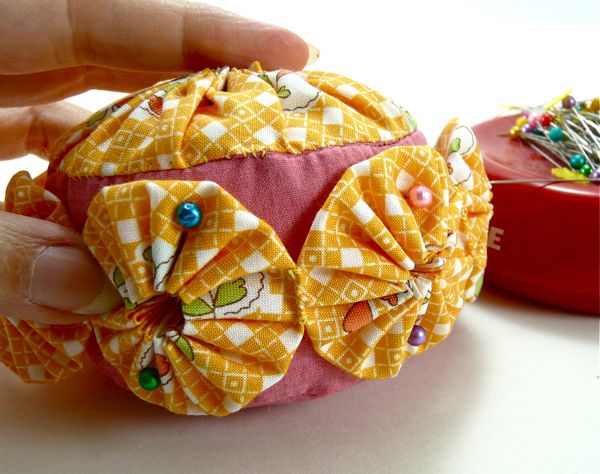
yoyo_pincushion_16

Wrap this strip around the side of the pincushion, and tack it in place with pins. (Same warning as before - don't be squeezing!)
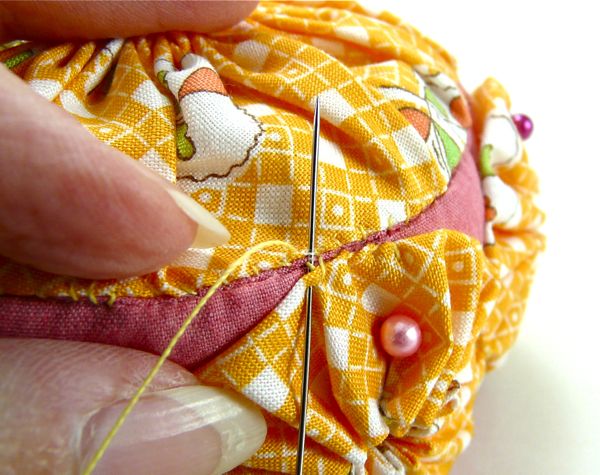
yoyo_pincushion_17

Whip stitch the top and bottom of each yo-yo to the pincushion - again, you can use those seams as a sewing guide.

When I've finished stitching one yo-yo down, I just pass the needle through the pincushion and bring it out where I need to start stitching the next yo-yo.
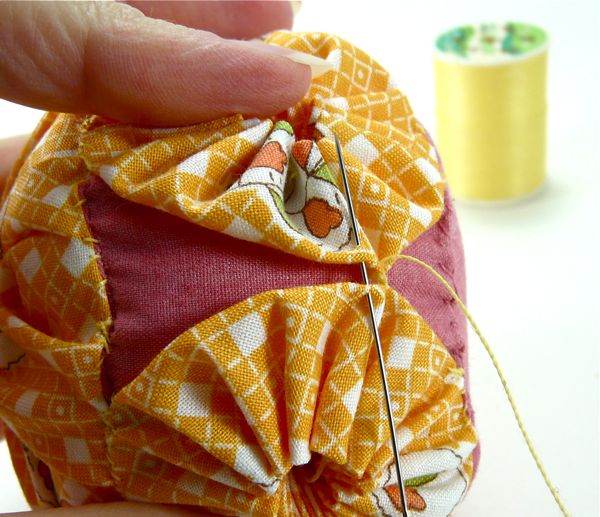
yoyo_pincushion_18

Lastly, stitch the two end yo-yos together at the side. Remove all those pins.

(Man! My hand-sewing starts to look pretty wonky in the macro lens. I assure you, at actual size, it's much less embarrassing.)
yoyo_pincushion_19

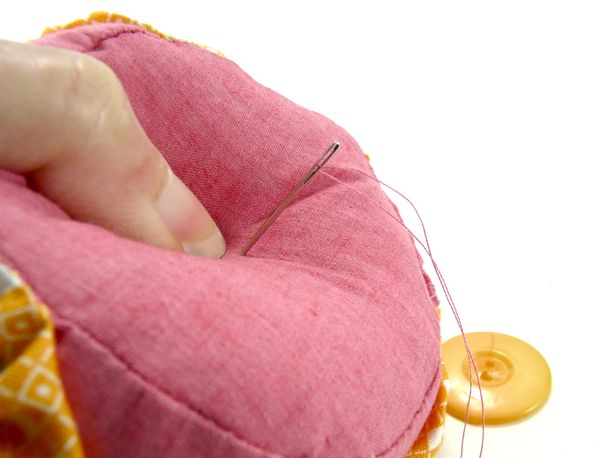
Now, we'll sew a nice, big button to the top of the pincushion. This helps squish it a bit flatter and give it a cuter shape.

Thread a needle with doubled thread, and tie a nice, big knot in the end. Pass the needle through the pincushion from bottom to top, squishing it a little to help the needle reach through.
yoyo_pincushion_21

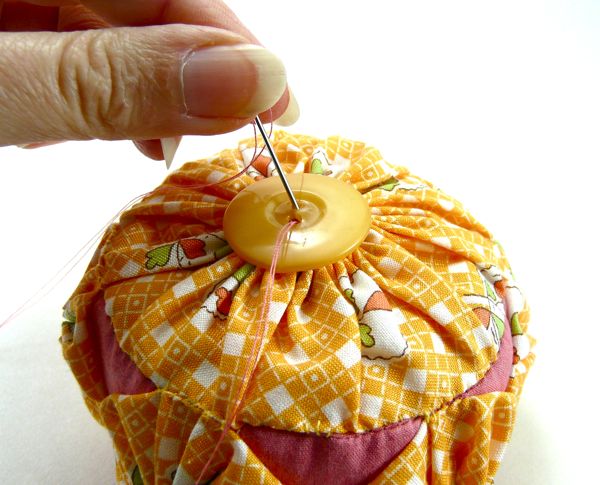
Next, thread a button onto the needle. Pass the needle back down through the button, as shown. Make several stitches through the pincushion and button like this, pulling them fairly tight, so the shape of the pincushion gets compressed a bit.
yoyo_pincushion_20

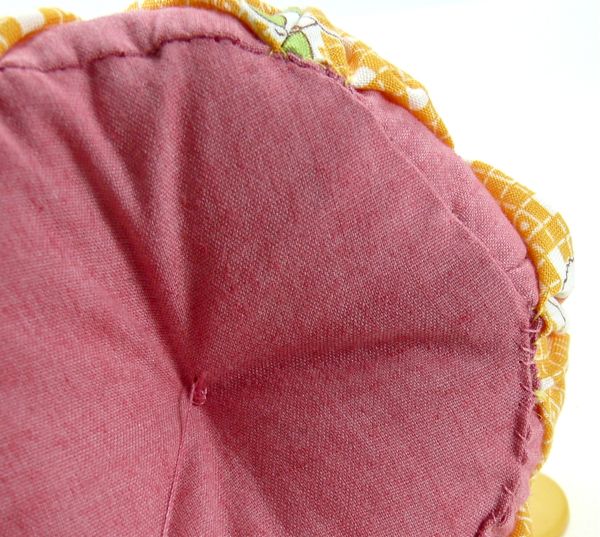
Lastly, tie a nice, secure knot in the thread at the bottom of the pin cushion.
yoyo_pincushion_22

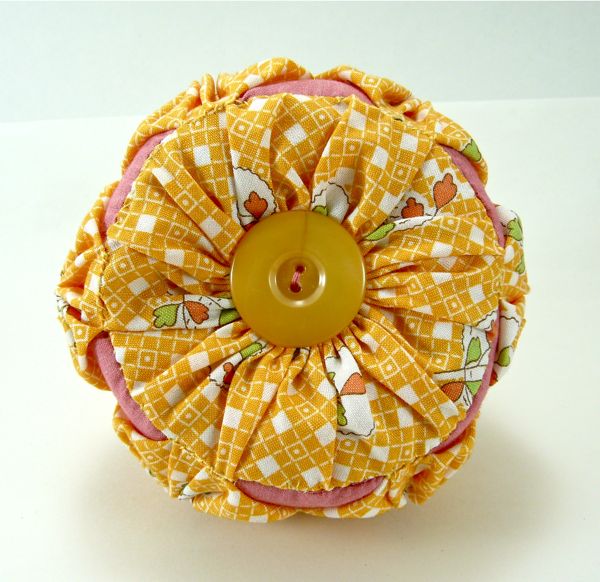
If you make one of these, will you please, please upload a picture to the CraftyPod Flickr Group? I'd love to see it!

Pages