Diane's blog


I loves me some of those old-school composition books. Last August, our local Fred Meyer had them on sale for 25 cents apiece for back-to-school, and K and I laid in a stock to get us well into our old age.

I've been noodling with ways to make them look prettier. There are tons of tutorials on the web for mixed-media treatments, or removable patchwork covers. But I wanted something a little more simple and durable - after all, my notebooks take abuse.

I don't know why it took me so long to arrive at this dead-simple idea, but here you go.

So first, you'll need a piece of fabric that's roughly 1" larger on all sides than your opened-flat composition book.

This project works best with a woven cotton that's a little on the thicker side and tightly woven. Quilting cottons are ideal. Do take a moment and see whether the black-and-white composition book cover will show through the fabric - this can happen with light colors especially.

Next, get a sheet of fusible web that's slightly smaller on all sides than the fabric. You'll notice that I haven't gone to too much trouble to cut anything perfectly straight. This tutorial was shot on a Sunday morning. There's no need to get too exacting about anything on a Sunday morning.

Place the fabric on an ironing board wrong side up. Place the fusible web over the fabric, with the web side facing down.

Your iron should be on high heat with no steam (No steam is really important here.) Pass the hot iron over the paper backing of the fusible web. Keep the iron moving, and make sure you iron over all of the paper - especially out to the edges.

When you're done ironing, let the fabric and paper cool for a moment.

Gently peel away the paper. See the shiny glue fused to the back of the fabric?

You should end up with a nice, even coat of glue fused to the back of your fabric. If you end up with bare spots, try placing the backing over the fabric again in the same position, and iron over the bare spots again to transfer the glue from the paper to the fabric.

Now, place the fabric on your ironing board with the glue side facing up. Place your composition book over the fabric, like this. Then, close the book, folding the fabric over it.

Take a moment to adjust the placement of the fabric as needed. This is why we made the fabric bigger than the book - so we'd have some leeway for adjustments.

Make sure the fabric is smoothly spread over the cover of the book. Then, iron the fabric to bond it to the cover. Again, keep the iron moving and make sure you iron along all the edges of the cover.

Flip the book over and re-smooth the fabric. Iron the fabric to the back cover.

Lastly, run the iron along the spine a few times. Then let everything cool for a moment.

Next, trim the fabric along the edges of the book cover. I like to use my rotary cutter for this, but you can also cut along the edges with some scissors.

(Don't you love all these conversion tables and things on the inside covers of composition books?)

I prefer to use scissors to trim the fabric along the rounded corners.

As a last step, iron along all the edges and corners of the cover one more time, to make sure that fabric is good and fused there.

...And it's done! Don't you love this 70's fabric? I'm only going to use this notebook to write about my dates with Keith Partridge.

Of course, since you're playing with fusible web, you could also fuse a solid fabric to the cover and then fuse some cut-outs from other fabrics over that. There are a million and one possibilities.

OOh -and since we're here, I'll show you another idea that didn't pan out so well. I thought it would be cool to cover a notebook with duct tape. Since I spend a lot of time at marshy bus stops, it seemed like a nice waterproof option. But, I overlapped the strips of tape, and I don't love the look of that after all.

(I cut those flower shapes out of more duct tape with an Xacto knife. As you might imagine, it ended up being decidedly not fun.)

Anyway. Happy New Week, everyone!

I kid you not: I first made this project, from start to finish, in a dream. (Which was pretty great - I mean, it's so hard to find crafting-time during my waking hours. Wish I could manage to craft in my sleep more often.)

Anyway. I like these simple notepads - they're a fun way to re-purpose cardboard into something useful.

In my dream, I used a Kleenex box, so I'll start with one here, too. But you can really use any chipboard box with interesting graphics.

So, cut your box apart into panels. You an really make these notepads in any shape and size your particular box will accommodate. Since this Kleenex box has that big plastic window in the top, I'm opting to use the side here, which will yield a long, narrow notepad.

Turn the chipboard over to the back. Get a ruler and a pencil, and draw two parallel lines, about 3/8" apart, in the center.

...Then, score these lines with a bone folder. (Jolly useful, those bone-folders.)

Fold the chipboard along those score lines, and now you have a cover for your notepad. So far, so good!

Now, you'll need to cut some paper for inside pages. You can use fresh sheets, or sheets from your recycle bin, or magazine pages, or any other interesting paper you like. You'll need to cut a series of long strips, measuring about 1/8" smaller on all sides than your cover piece.

So, by way of example, my cover piece measures 3" wide and 8 1/2" long. I cut my paper strips about 2 3/4" wide and 8 1/4" long. But if you hate measuring, don't! Just make the paper a little smaller than the chipboard, and all will be well.

Separate the paper into equal bundles. I cut up five sheets of paper here, so I have three bundles of five pieces each. (But you can totally vary this to suit your fancy.)

Fold each bundle in half crosswise. Unfold it, and staple it once along that fold line.

Ooh! A Lazy Bookbinder's Trick: place the staple in a different spot on each bundle. That way, you can pack the bundles together more tightly when you bind them into the cover.

(This might be a good time to add: you could also make these notepads with fancier stitched bookbinding methods, like this or this.)

Now, take your cover, and apply some strong, flexible glue, like E6000 or Amazing Goop, inside the spine.

Press those paper bundles together, and set them into the glue.

Fold the cover closed, making sure all those bundles are pressed firmly into that spine-glue. Then, place a weight on the pad and leave it to dry for several hours or overnight.

(Yup, Amy, that is what you think it is.) :-)

When the binding is dry, then you'll need a little strip of chipboard. Mine measures about 3/4" x 3" Score this piece twice in the center, like you did the cover. The scores should be about 3/8" apart, same as your cover.

You'll also need a nice big button - 1" or larger.

Glue one side of the strip to the back of the cover - Tacky Glue is fine for this.

Then, stick some velcro to the strip and the cover, as shown here. I'm using those self-adhesive velcro dots, and I trimmed them down a little to fit. You can also use regular velcro, and glue it down.

Lastly, glue your button in place on top of that closure strip. Let everything dry completely before you try opening the cover.

These are easy to make, and addictive! There are a million creative possibilities here - you can use old album covers, or food boxes, or toy packaging, and on and on. The world is filled with interesting cardboard, my friends.

...I should say, too, that in my dream, I was able to open and close this notepad with my mind. Sadly, I have not been able to figure out how to make this part of the project work.

This project is a real example of crafty serendipity. I've been noodling with this stiffened-fabric idea since June, but with one thing and another and another, haven't gotten around to posting it.

When I finally went to photograph this tutorial, I realized the season was changing, and I'd need to switch from the summery fabrics I'd been using to something more Fall-appropriate. And that fabric switch totally transformed the project.

Anyway, here's how it's done...

To begin, you'll need a number of things handy:

  • A bunch of woven-cotton fabric squares (I'm using 2" and 1 1/2" ones here, but - experiment!)
  • Some fabric stiffener (I like Stiffy, and there's also Aleene's.)
  • A work surface (wrap a piece of cardboard tightly with plastic wrap, and tape it to the back.)

Pour some stiffener into a shallow dish. Have some paper towels at the ready - things will get messy!

Saturate a square of fabric in the stiffener, and lightly wipe away the excess. There should be a film of stiffener over the surface, but you should be able to see the pattern through that.

Place the square face down on that plastic-wrapped surface. Gently fold the four corners in to meet at the center, as shown. You'll have plenty of time to adjust them so the resulting shape is nice and square.

Some fabrics will fray a little during this process, and leave little threads sticking out at the corners, Don't worry about this right now - we'll deal with it later.

Stiffer fabrics have a tendency to pop up in the center. If this is happening, just dip your finger in the stiffener and place a dot of it over those four corners, as shown. It'll vanish when it dries.

I like to let the pieces sit a few minutes, and then gently plump up the squares by pinching them on the sides a bit. I think they're prettier if they aren't totally flat.

Make as many pieces as you need, and leave the whole thing to dry completely. This will probably take overnight.

When it's all dry, you can gently peel the squares off the plastic wrap. Sometimes it helps to slide a thumbnail under the edge to get it started.

...And now, we'll trim off those bits of frayed thread! Now that the fabric is stiffened, you won't see any more fraying.

If you find a little ridge of dried stiffener at the edges of your square, just scrape it away with your thumbnail.

So now you have all these design elements to mix and match. You can combine different sizes, fabrics, and configurations to make all kinds of pretty things.

I'm arranging these fabric tiles with the four folded-in corners facing up, by the way.

...And then we'll add some buttons, which makes things even more interesting.

So, to assemble these tiles into jewelry, we'll sew them. The stiffened fabric is still stitch-able, but I'd recommend keeping a thimble and a pair of needle-nose pliers handy - they help push and pull your needle if it gets stuck.

First, we'll sew a button to this tile. Let's hide the knot in our thread under the button. Just pass the needle down through the center of the tile. These tiles are quite stiff now, but still, handle them carefully. Try not to bend or crush them.

If you wiggle your needle a bit as you press it into the stiff fabric, it'll go through more easily.

From here, sew on your button as you normally would. Once you've made the first set of needle holes, you can keep using them for the rest of the stitches.

(Incidentally, I love using a contrasting thread with the button. I'm working with doubled thread here, but that can be fiddly. Single thread works great, too.)

To finish the thread, pass it under your stitches on the back of the tile, and then knot it.

Here are a couple variations on this idea. When I want to stack up several tiles into one piece as you see here, I'll follow the same steps to hide the knot under my button, but then I'll also take a couple stitches through all the tiles. That helps hold them in place while I sew on the button.

And also, I prefer sew-through buttons for this project overall, because they'll stay flatter against the fabric. However, I found this shank button in my stash - it has a really shallow shank, so it worked well.

I like using simple methods to convert these pieces into jewelry. You can easily sew on a jump ring, as seen here, and then add it to a chain or neckwire.

Or, you can pass a needle through the top edge of back tile, as shown here. This allows you to suspend the piece from waxed thread, narrow ribbon, or (in this case) pearl cotton.

You can totally use these tiles in clusters. In fact, you can make a whole lot of other things besides jewelry! Consider these ideas:

  • They'd make a cool garland.
  • You could make some interesting holiday ornaments.
  • They'd make pretty package toppers or gift tags.
  • They'd also be cool card embellishments.
  • They'd be an interesting dimensional embellishment on a curtain
  • Ditto for a lampshade.

What other ideas do you come up with?

I was teaching a button pendant class at a wonderful local shop called All My Favorite Things over the weekend. And in chatting with the shop's owner, Melanie, I stumbled onto this fun little idea.

You've likely seen this style of button necklace. Well, this project replicates that kind of stringing, only with wire.
Wanna play? Get yourself a pile of small buttons (say, 3/8" or smaller) and some 24 gauge craft wire. It helps to have some wire cutters and needle-nose pliers handy, too.

Getting Started

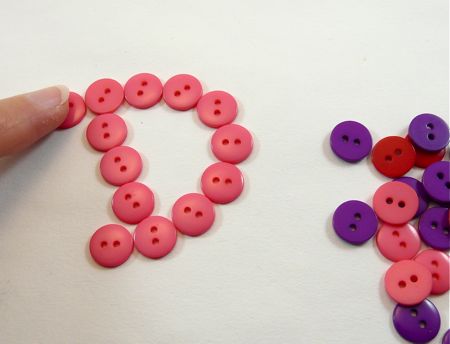
I like to begin by laying my letter out in buttons first. This helps me decide on the size and shape, and figure out whether I have enough buttons. (Incidentally, I like two-hole buttons for this project, but four-holes would also work.)
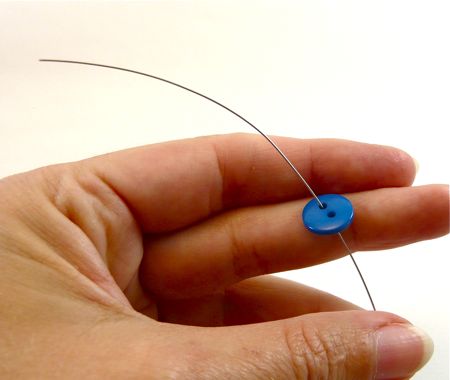
Then, cut about 18" of wire. Bring one end of it up through the back of your first button, leaving a 4" - 5" tail.
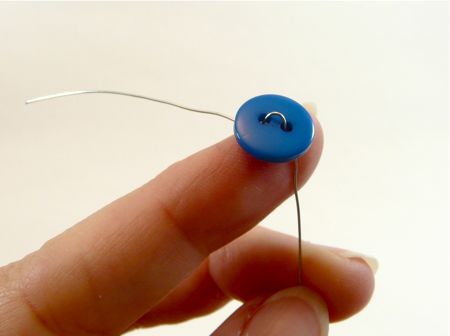
Stitch the other end of the wire - the longer end - down through the other hole in the button, and pull it snug, like this.
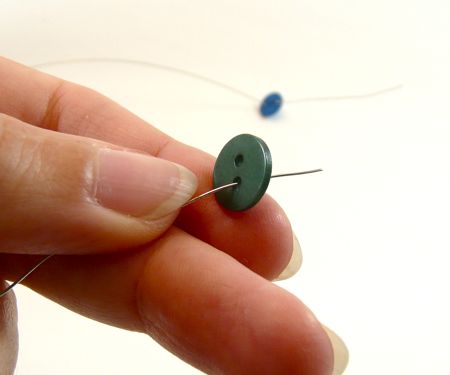
From here, you'll be working with the longer end of the wire. Pass it through the back side of the next button (either hole).
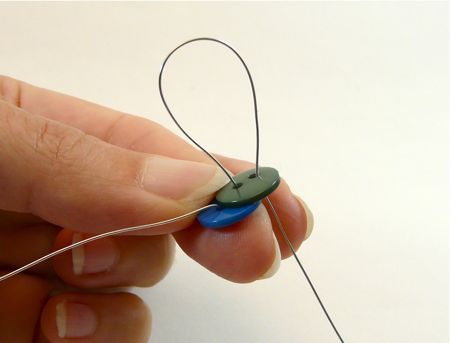
Slide this new button along the wire until it rests against the back of the first button. Then, stitch the wire back down through the other hole again, and pull the wire snug.
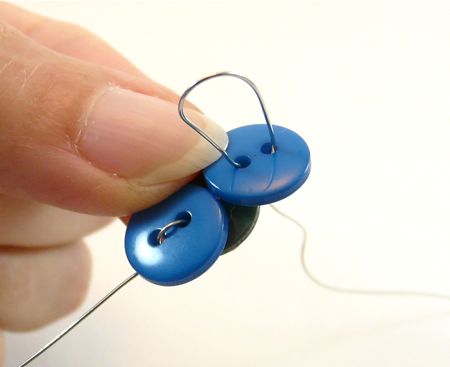
Repeat this process to add more buttons. (Of course, you can use buttons that are all the same color if you like - I like the contrast of two colors.)
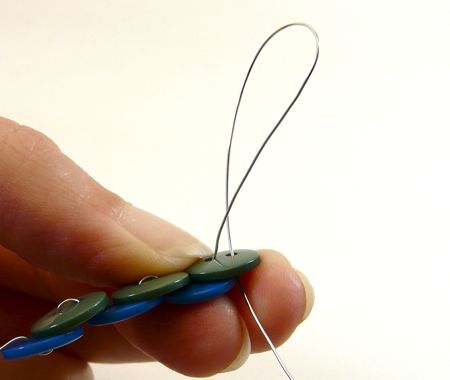
Careful of kinks!

...But I would like to give you a little wire tip: as you're pulling these wire stitches through, this thin wire will often try to twist itself, like this.

Be careful of these twists! They can cause your wire to form kinks, and kinks will cause the wire to break.
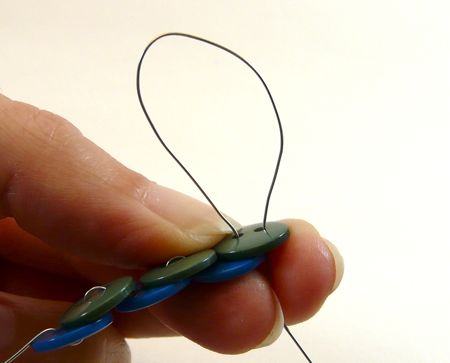
So, any time you see the wire twisting, stop and gently un-twist it. In fact, as you're pulling these wire stitches through, you'll probably fall into a pattern of pull, untwist, pull, untwist, pull. It becomes very easy after the first few buttons.
Finishing

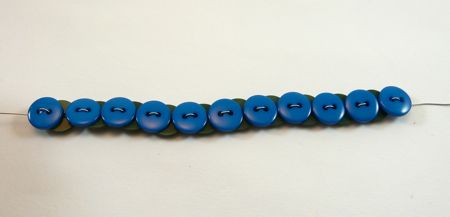
Soon, you'll have a strand of buttons as long as you need.

Here's an important note: if your letter will be made of one open strand, like an "S" or a "C," then your button strand should begin and end with top-facing buttons, like the blue ones in this photo.

But if your letter involves connecting the ends of the strand, like an "O," then you'll need one end to be top-facing and the other end to be bottom-facing, so they can be wired together.

If that's confusing, jump to the "Letter Assembly" section below.
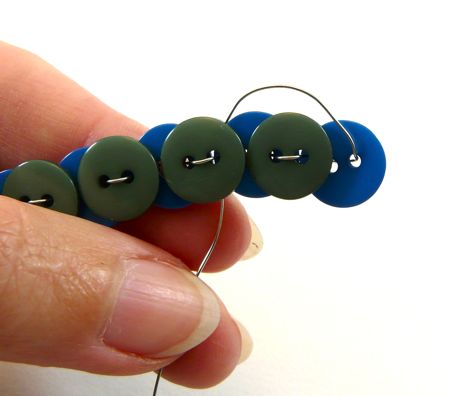
Now we need to secure the ends of the wire. Take the excess wire at one end of your button strand, and work it into the space between the two rows of buttons. (You can always bend the buttons around a little if you need to.)
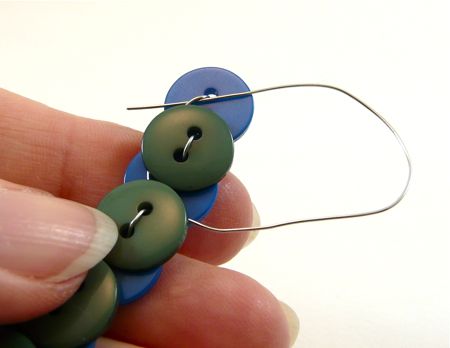
Pull the wire taut so you can't see it anymore - and pliers really help with this. Then, feed the end of the wire back between the rows of buttons and through some of the wiring between them as well.

There's no exact science here - you just need to wind the loose end of the wire firmly between the buttons a couple times. You want to get it a little entangled in the wiring you've already done while stringing the buttons. And most importantly, you want to pull it tight enough that it disappears between the buttons.
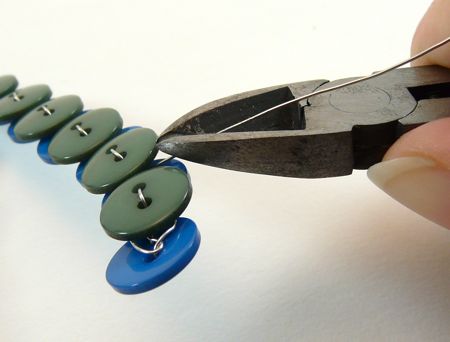
When you're done with that, cut the end of the wire close to the buttons. Use the pliers to bend the tiny cut end out of sight.

Repeat this process to finish off the other end.
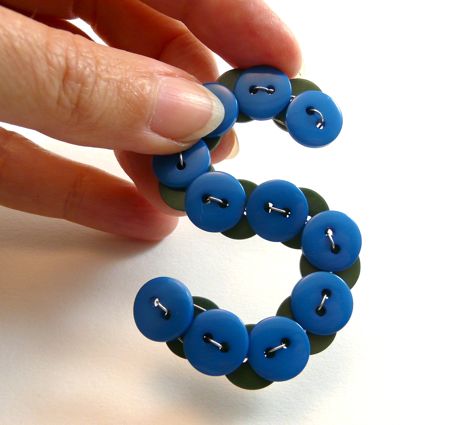
Then you can bend your strand into a letter shape!
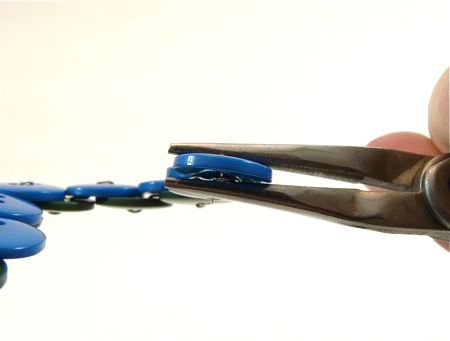
Incidentally, if the buttons at the ends of the strand are a little floppy, you can fix that by giving them a little mash across the wire-stitch with your pliers.
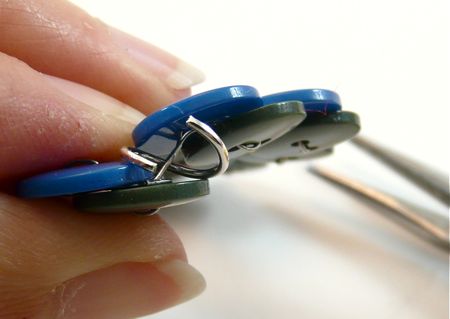
If you want to turn your monogram into jewelry, you can use two large (8-10mm) jump rings. Wiggle one into place around the internal wiring of your strand, and then close it.
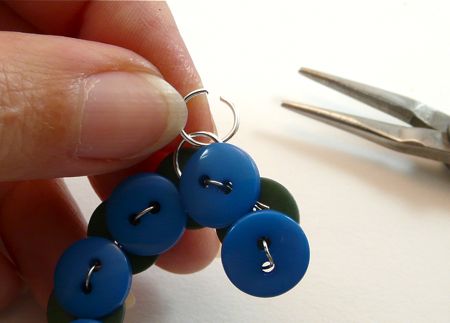
...Then add a second ring to accommodate a chain or cord.
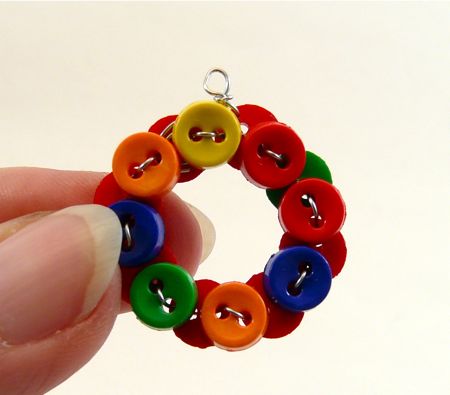
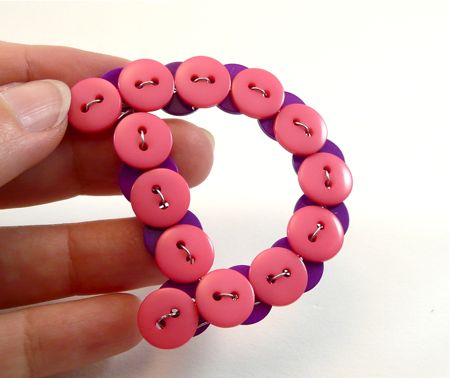
Or, you can do like I did here - these doll buttons were way too tiny to manouver a jump ring into. So, after wiring the ends of the strand together in an "O," I just made a tiny wrapped loop from one end of the excess wire.

(Incidentally, these tiny buttons are awesome looking, but rather fiddly. I'd recommend making your first monogram from larger buttons.)
Letter Assembly

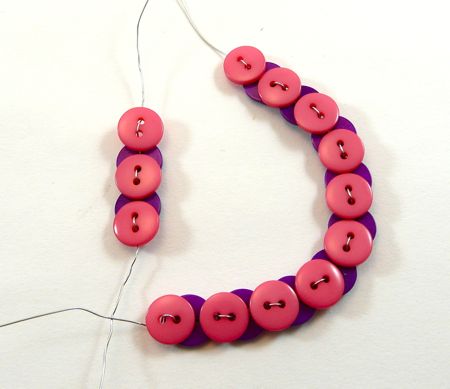
If you're making a letter that has two pieces, like this "D," you can string them up separately.

As you string, you'll want to pay attention to how the buttons will fit together. For example: here, I know I'll need those pink buttons at the ends of the back of my "D" to tuck into place over the purple buttons in the curve.

Here and there, you may find that you have to remove a button from the end of a strand so the pieces will fit together.
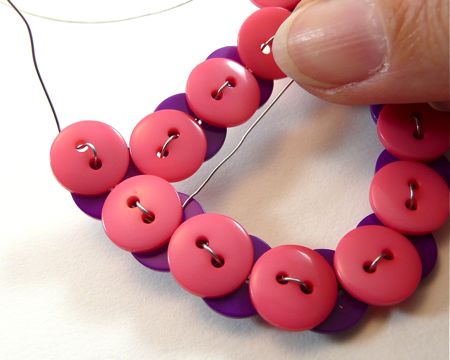
...See how they fit here? And then you can wrap the excess wire at the ends around between the buttons, like we did earlier when we finished the blue strand.
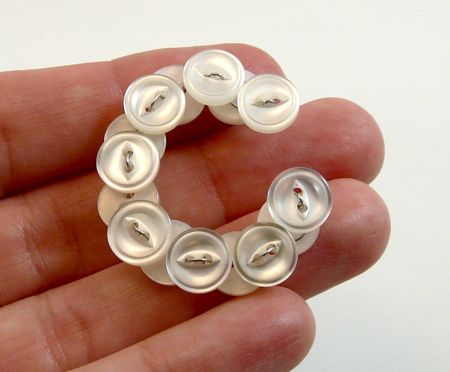
What will you make?

I think these little guys have lots of possibilities! In addition to pendants, they'd be really cute as a dangle on a handbag. Or, as a package tie-on. Or, imagine a curtain for a child's room, with a fringe of button letters.

(Okay, okay, that last one might be crazy-talk. But it would be really cool.) If you make some of these, I'd love to see what you do with them!

This little project was born on a recent trip to the Goodwill Outlet, locally known as The Bins. I stumbled onto a huge pile of paperback books with nice, lurid covers, and thought they'd make great picture frames.

Here's a view of the inside:

So, here's how to whip one up:

Start by measuring the book. Then, use that measurement to size a couple photos in your computer. They should be a little smaller than the page size. Print them out on photo paper.

Take your paperback and divide the pages in half.

Secure the top and bottom of each half with binder clips, as shown here.

Cut yourself a template for the frame opening. The size will depend on how your book is laid out, and whether you want any of the text to show around your photos. When you have a template you like, center it on each page and trace it in pencil.

Use a metal ruler and a nice, sharp craft knife to cut along your traced lines. Cut into the book a couple times - you want the blade to pass about 1/8" to 1/4" deep through the pages.

The beauty of this little project is, you can cut as many openings for photos in various sizes and shapes as you like.

Carefully remove the centers of the cut pages until you have a well as deep as you like. Save those cut-outs for collages!

Remove the binder clips. Position your photo under the window, and glue it in place with some glue stick.

Now, open the book at about a 45-degree angle. Put the binder clips back on, but in this configuration.

Depending on the condition of your book, you may need to place a binder clip in the top edge of each side, as shown. How can you tell if this is necessary? Take a look at the right-hand side of the book here. See how the pages are bowed out a bit in the center? We need them to lie flatter against each other. As you can see on the left-hand cover, a binder clip presses them together nicely.

Now, brush a generous coat of Mod Podge over the edge of the pages. The glue will seep into the pages a bit and bind them together. Let this coat dry, and add a second coat.

Don't worry about brushing any glue under that binder clip. Instead, put on two coats around the clip first. Once they dry, slide the clip to one side and brush two coats on the remaining area.

If you have enough binder clips, and a something to prop the sides of the book up with, then you can Mod Podge the top and bottom edges of the book simultaneously.

When the top and bottom edges are dry, then repeat the process to coat the sides in Mod Podge. Again, work around the binder clips initially, and then slide them aside to finish up.

Allow this step to dry, and then remove all the binder clips. The book is now rigid, and holds itself open at an angle. Voila!

The book cover/photo combination possibilities are endless. And you could also use this frame for artwork. Oddly, I can also see these frames, made from romance novels, bearing a photo of a bride and groom - and being used as table decorations at a (rather hip) wedding.

sharpening-pincushion

My pins and needles really take a beating, and I've noticed that they're all dulling a bit. So I thought I'd try to make a pincushion that's also a sharpener.

This is based on those little strawberry-things that dangle from the tomato pincushions. They're filled with metal filings, and you poke your pins into them to sharpen.

I didn't have one of these, but I did have some grade 00 steel wool. So I made up a pincushion (the adorable design from Joelle Hoverson's book) and put this together.

Steel wool comes in pads, so first, I unrolled one...

...And tore it up a bit. (Makes a huge mess, as you can see.)

Then I stuffed my pincushion with it. I got two pads in there, and then had to stop. I probably could have used a half-pad more, but:

...I got worried about how much my raw edges were fraying. (Next time, I'd put some Fray-Check on them before stuffing.) Also, I got worried that my fingerprints were wearing off.

Anyway, then I finished off the pincushion. Yeah, it's a little wonky.

But, I've been testing pins and needles, and it works great! Just a few passes in and out, and they're nice and sharp again. Cool!

Obviously, this pincushion is way too large for such a project, but I needed an excuse to make it. (You definitely do not want to store your pins or needles in a cushion like this - they can rust.) What would be perfect, though, is those bottle cap pincushions!

I was teaching a card-making class over the weekend, and the nicest woman ever said to me, "Have you tried making boxes from your old cards?"

Well, I hadn't, so she showed me the coolest method for converting an old greeting card into a spanking little gift box. And not only that, at the next day's class, she brought me a pile of blank greeting cards, so I could show this to the next Church of Craft meeting. Unbelievably kind! Thank you so much, Deanna.

So, this technique is so exciting, I had to share. You may not be ready to look at Christmas stuff yet, so just imagine a Halloween card in its place if you need to.

Start with a greeting card. If there's writing on the inside, you can glue-stick some paper over it to cover it up.

Cut the card in half along the fold.

Take one half of the card. Trim about 1/8" off of one long side, and one short side. (If you have a paper cutter, of course, use that.) You do this so that the bottom of your box will be slightly smaller than the top, and they'll fit nicely together.

Now, make a score 1" from the edge on all four sides. (If you have a paper cutter with a scoring blade this is easy. If not, you can use a ruler and a bone-folder, or even a ruler and an empty ball-point pen to make the scoring.)

I've marked my score lines in heavy pencil here, so they're visible in this tutorial. You probably won't want to make any marks on your card.

Fold the card along all four score-lines. Then, score and fold the other half of the card in the same way.

Now, at the shorter ends of each piece of card, you're going to make two small cuts, where the two folds intersect. The second photo explains this better than I'm doing.

Put a little tab of double-stick tape on each of the resulting flaps.

Now, fold up the long sides of your box, and fold these tabs in as shown.

. . . And fold up that end flap and press the tape to stick it in place.

Make the other half of the box in the same way, and presto!

I can see these for little gifties, but also for cool holiday-dinner favors/placecards. And keep in mind that you can vary the size and depth of these by simply changing the location of your scores. You can score 2" from each edge, for example, and get a much smaller, deeper box - suitable for a gift of homemade truffles.

Pages