You are here
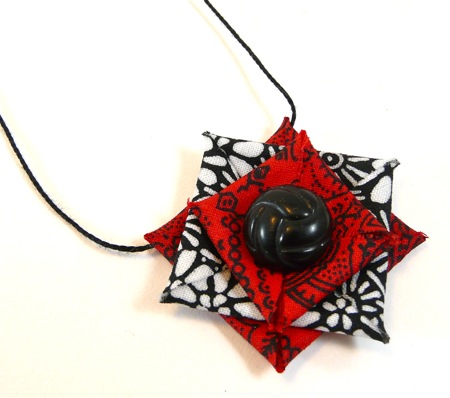
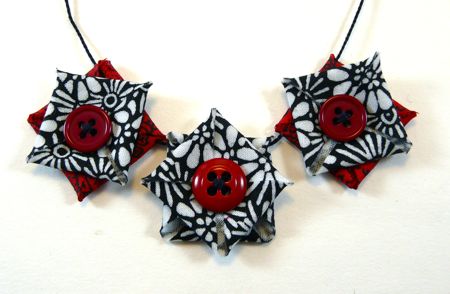
How to Make Stiffened Fabric Jewelry
This project is a real example of crafty serendipity. I've been noodling with this stiffened-fabric idea since June, but with one thing and another and another, haven't gotten around to posting it.
When I finally went to photograph this tutorial, I realized the season was changing, and I'd need to switch from the summery fabrics I'd been using to something more Fall-appropriate. And that fabric switch totally transformed the project.
Anyway, here's how it's done...

To begin, you'll need a number of things handy:
- A bunch of woven-cotton fabric squares (I'm using 2" and 1 1/2" ones here, but - experiment!)
- Some fabric stiffener (I like Stiffy, and there's also Aleene's.)
- A work surface (wrap a piece of cardboard tightly with plastic wrap, and tape it to the back.)
Pour some stiffener into a shallow dish. Have some paper towels at the ready - things will get messy!
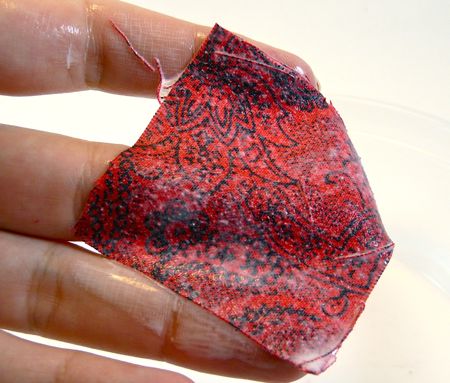
Saturate a square of fabric in the stiffener, and lightly wipe away the excess. There should be a film of stiffener over the surface, but you should be able to see the pattern through that.
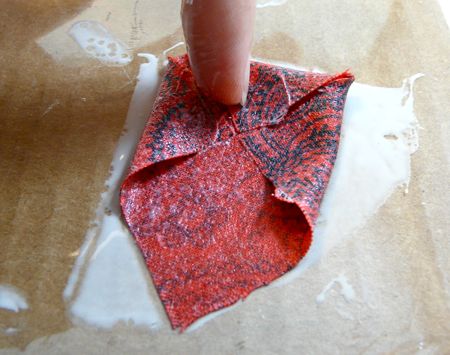
Place the square face down on that plastic-wrapped surface. Gently fold the four corners in to meet at the center, as shown. You'll have plenty of time to adjust them so the resulting shape is nice and square.
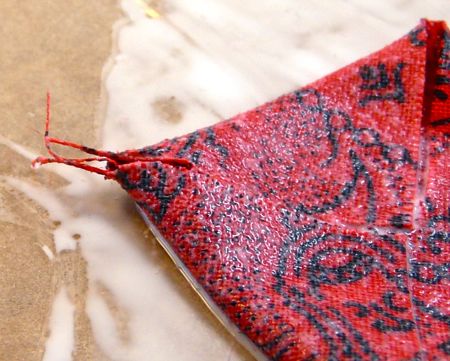
Some fabrics will fray a little during this process, and leave little threads sticking out at the corners, Don't worry about this right now - we'll deal with it later.
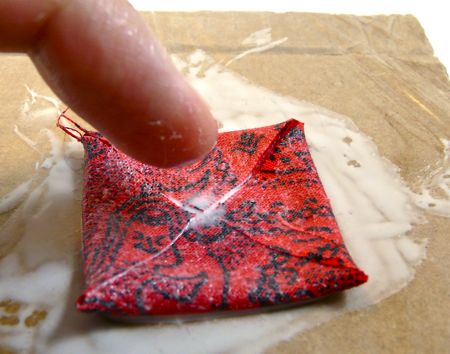
Stiffer fabrics have a tendency to pop up in the center. If this is happening, just dip your finger in the stiffener and place a dot of it over those four corners, as shown. It'll vanish when it dries.
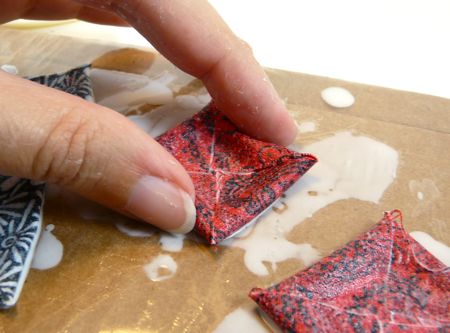
I like to let the pieces sit a few minutes, and then gently plump up the squares by pinching them on the sides a bit. I think they're prettier if they aren't totally flat.
Make as many pieces as you need, and leave the whole thing to dry completely. This will probably take overnight.
When it's all dry, you can gently peel the squares off the plastic wrap. Sometimes it helps to slide a thumbnail under the edge to get it started.
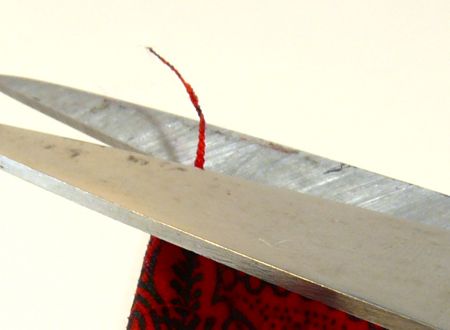
...And now, we'll trim off those bits of frayed thread! Now that the fabric is stiffened, you won't see any more fraying.
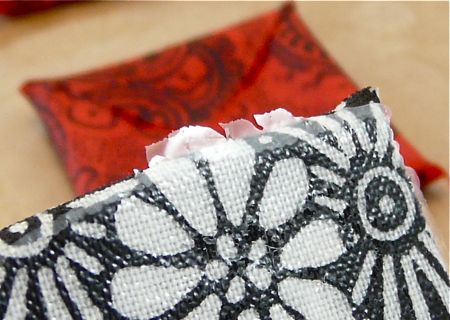
If you find a little ridge of dried stiffener at the edges of your square, just scrape it away with your thumbnail.
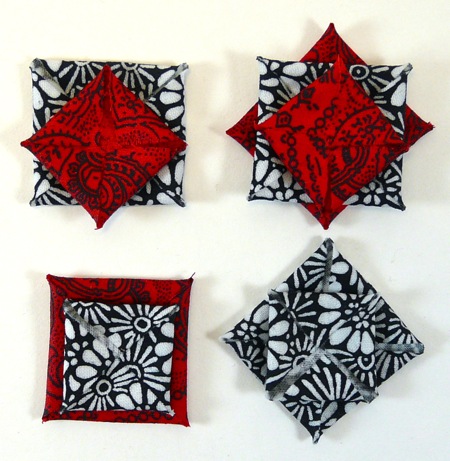
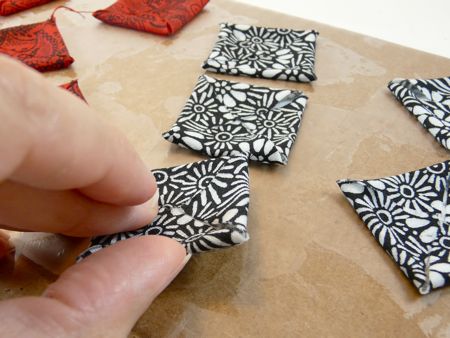
So now you have all these design elements to mix and match. You can combine different sizes, fabrics, and configurations to make all kinds of pretty things.
I'm arranging these fabric tiles with the four folded-in corners facing up, by the way.
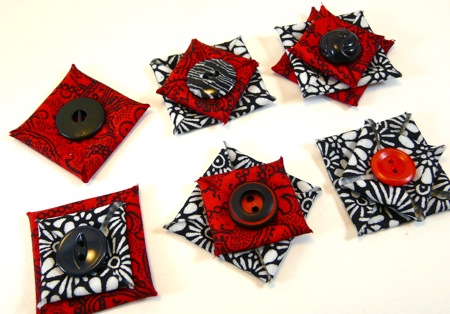
...And then we'll add some buttons, which makes things even more interesting.
So, to assemble these tiles into jewelry, we'll sew them. The stiffened fabric is still stitch-able, but I'd recommend keeping a thimble and a pair of needle-nose pliers handy - they help push and pull your needle if it gets stuck.
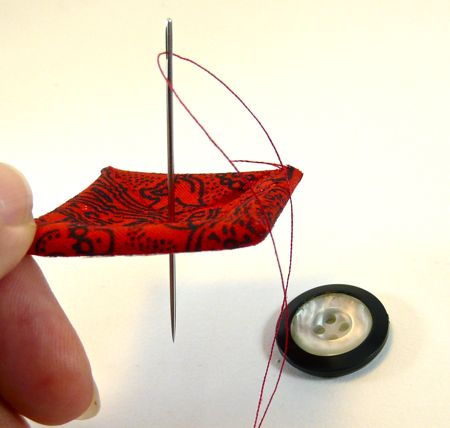
First, we'll sew a button to this tile. Let's hide the knot in our thread under the button. Just pass the needle down through the center of the tile. These tiles are quite stiff now, but still, handle them carefully. Try not to bend or crush them.
If you wiggle your needle a bit as you press it into the stiff fabric, it'll go through more easily.
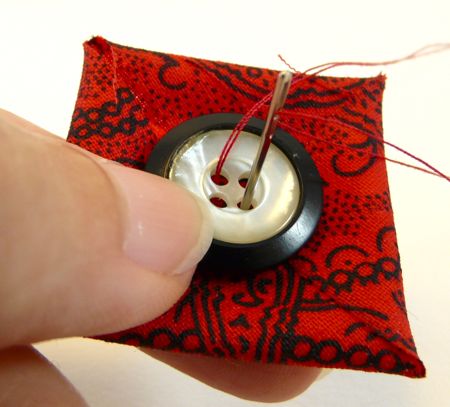
From here, sew on your button as you normally would. Once you've made the first set of needle holes, you can keep using them for the rest of the stitches.
(Incidentally, I love using a contrasting thread with the button. I'm working with doubled thread here, but that can be fiddly. Single thread works great, too.)
To finish the thread, pass it under your stitches on the back of the tile, and then knot it.
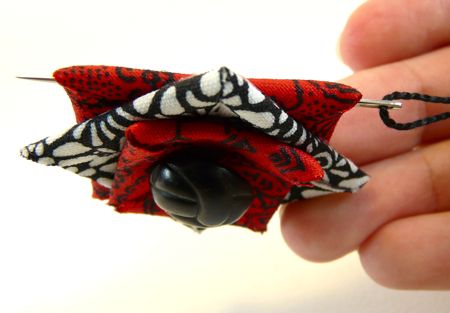
Here are a couple variations on this idea. When I want to stack up several tiles into one piece as you see here, I'll follow the same steps to hide the knot under my button, but then I'll also take a couple stitches through all the tiles. That helps hold them in place while I sew on the button.
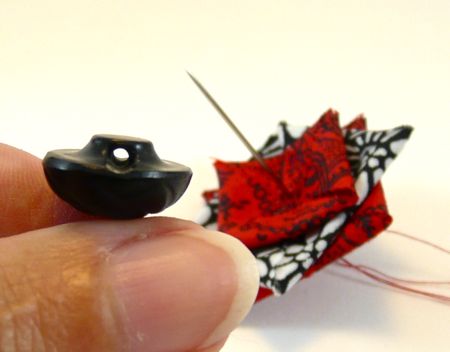
And also, I prefer sew-through buttons for this project overall, because they'll stay flatter against the fabric. However, I found this shank button in my stash - it has a really shallow shank, so it worked well.


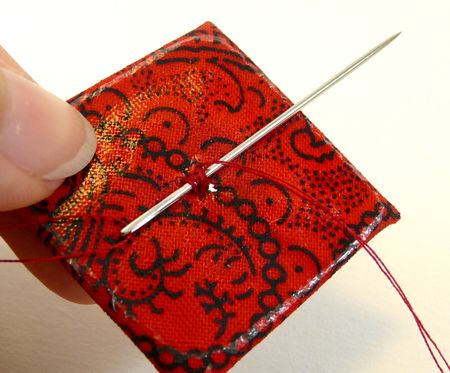
I like using simple methods to convert these pieces into jewelry. You can easily sew on a jump ring, as seen here, and then add it to a chain or neckwire.
Or, you can pass a needle through the top edge of back tile, as shown here. This allows you to suspend the piece from waxed thread, narrow ribbon, or (in this case) pearl cotton.
You can totally use these tiles in clusters. In fact, you can make a whole lot of other things besides jewelry! Consider these ideas:
- They'd make a cool garland.
- You could make some interesting holiday ornaments.
- They'd make pretty package toppers or gift tags.
- They'd also be cool card embellishments.
- They'd be an interesting dimensional embellishment on a curtain
- Ditto for a lampshade.
What other ideas do you come up with?

![[Valid RSS]](../../../sites/files_cp7/valid-rss.png "Validate my RSS feed")
Comments
Wow, cool tutorial. Thanks for sharing! I think the garland idea is fantastic as I was already picturing home decor, holiday wreath type of thing.
Wow, a wreath would be really cool! I can visualize one covered in all
these little tiles, with some nice, shiny buttons.
*Begins eyeing fabric stash meaningfully*
Diane, that's awesome! Another great thing to do with fabric scraps. I'm so going to look for some fabric stiffener tomorrow!
I love this idea! These are just beautiful in the fabrics you have chosen.
And I love that you are posting tutorials again! Especially now that Christmas is less than 100 days away! This one has so many holiday possibilities!
I love this...and I have never posted a comment on anything. This is just so colorful and easy.
This is so cute!
Wonderful idea on making unique fabric jewelry. There are so many luscious fabrics especially now with the Halloween costume fabrics out. Thanks for perking up my Muse.
dot
Waaaaaay cute! You can speed up the drying process in the micorwave IF you use caution and supervision.
In a previous lifetime I neglected to watch my progress and about ruined a good microwave in the process. Burnt stiffener. That's one smell that tops burnt popcorn in difficulty to rid. Oh the cost of wisdom!
Hee hee hee... now, THAT is a high-quality crafty-disaster story!
(Ack, that smell must be... blecch.)
garland would look cool, or make hanging decorations with them. or put on bags would look great if you used a different colour the bag :)
OOh, totally- I could see a neat little dangle embellishment on a bag.
Great idea!
Interesting. I've been making fabric medallions this week, too. Only mine are a lot more 1-dimensional -- and decoupaged, not stiffened. I really like the way that it intensifies the color of the fabric.
Anyway here's my necklace: http://www.flickr.com/photos/artsibitsi/3924149...
I love the ones you made! Those grommets are an awesome touch!
Very neat idea Sister Diane! I like the bold color choices and the layering of patterns. Great funky jewelry!
Thanks, Cindy! Yeah, the look was totally different with summery
colors. I like this bolder idea so much better.
Diane - Beautiful as usual! My mind is reeling with possibilities for using stiffened fabric now!
Rad! And crazy timing! My club packages I just sent out today include a stiffened cotton knit pattern - my first ever try at stiffening! I just used a mixture of white glue and water though, not wanting to take a trip to the craft store... but it worked fine, for my purpose, which was just to make the object flat and stiff-ish. Now I want to play around with the real stuff and fabric!
Wow, what a great idea and tutorial. Perfect for all the scraps that I've saved just because I love them so much. Thank you!
Hee hee . . . I have a big pile of those precious tiny bits, too. :-)
Very clever. Looks origami-like. And I love the fabrics you chose.
Wow, that's beautiful! What a fun way to wear some of my favorite fabric. Love, love, love! I'll be linking.
Thank you, Rachel! It's an honor to be featured on One Pretty Thing!
Thank you for sharing...I have so many small bits of fabric scraps that I can't wait to transform into jewelry!
I've seen some pretty nifty make-it-yourself jewelry on the net, but this one is really great! Thanks for sharing!
I have been searching for months on how to stiffen fabric, what a concept!
Now, my ? is,, can I stiffen fabric enough to make origami projects?
Please email me,, thanks so much!
On Thursday nights I have craft nite with four of my five daughters 33 - 15 yrs and a granddaughter 13 yrs old... And we would like to do an origami project but not w/paper.
Linda -
You can't really fold the fabric after it's been stiffened and dried.
And trying to do origami folds while it's wet will be too challenging
(I think.)
What I would do instead is finish the origami piece, and then brush
stiffener over it.
I'd recommend starting with large squares of fabric and they should be
as lightweight as possible. You might spray a little spray starch on
them and iron them first - this will help the fabric hold creases.
Interesting idea - good luck!
Read about this on The Beading Gem's Journal post and had to check it out. I can't wait to try this one! Thank you for sharing.
really cool. I like the idea. I've got masses of fabrics lying about. Now I know what I can do.
Another brilliant tutorial with buttons! I had never heard of this fabric stiffener. I'll have to try it out for a fabric origami project that I've used before. Thank you!
Another brilliant tutorial with buttons! I had never heard of this fabric stiffener. I'll have to try it out for a fabric origami project that I've used before. Thank you!
I love this, and am going to try it with handmade Japanese chirimen washi paper, which is floppy and fabric-y. I think it's going to be great! I love the Japanese patterns on your fabric, btw.
I love it! I've been looking for good ways to make fabric jewelry!
This is a very nifty idea for a dress maker or seamstress to match skirts and necklaces or pants and necklace or even get creative with the earrings and bracelats....I just think it is cool to have handcrafted items to wear. Dianne stuck in SElkirk On
How clever. Thanks for another great tutorial!
neato. check out my website and see how I use wire to stiffen fabric for jewelry and other stuff, also my etsy store Ficklesticks
Hmmm... I'm not so sure it would, Carolynne. Once you wet the batting with the stiffener, I think it would tend to flatten out quite a bit. Based on my experiences with this stuff, I feel like what you'd get is a thicker flower, but maybe not a puffy one.
But if you do any experimenting on your own, I'd love to see how it turns out!
wonderful idea, thanks
i'm a quilter and have been looking for a way to make cloth jewelry from my scraps. this technique seems easy and allows for total experimentation with texture and color!!!!!!!!!!!! thanks so much
Dianne,
I am looking for jewelry or projects that can be made out of clothing, and your idea is quite intriguing! We work with homeless women and have a work program that is in dire need of ideas. We have tons of clothing donated to our mission, and being a non-profit, we don't have a lot of money. We would love to have our ladies use some of this clothing (which won't cost us!) to make jewelry than can be sold for a reasonable price to help support our ladies.
I have a question: Can you stiffen the fabric and make cut-outs afterward? I'm thinking that might be easier to work with, and layering cute cut-outs might open more possibilities.
Thanks for your ideas!
Connie
Hi, Connie -
I haven't tried cutting any stiffened fabric. I suspect it could be done with a strong pair of scissors, but worry a little about hands getting tired and people having trouble cutting complex shapes easily. You might want to stiffen some test swatches and cut them and see what happens. Another option to try is spray starch. With very heavy application, you'd get something a bit softer than what you get with fabric stiffener. Hope this helps! And perhaps some of these alternate ideas will be useful too... http://www.beadinggem.com/2009/11/how-to-make-fabric-jewelry-tutorial.html
This is a great idea! I am going to try this one with handmade paper.Thanks Diane for the post!!
Wondering if Mod Podge would work for this project??
It probably would, Carmen - they have the fabric variety these days.
Ok great, thanks. I really like this idea. I have a friend who has metal allergies so making these pendants and putting it on one of those rubber necklaces would work great for her! :)