You are here
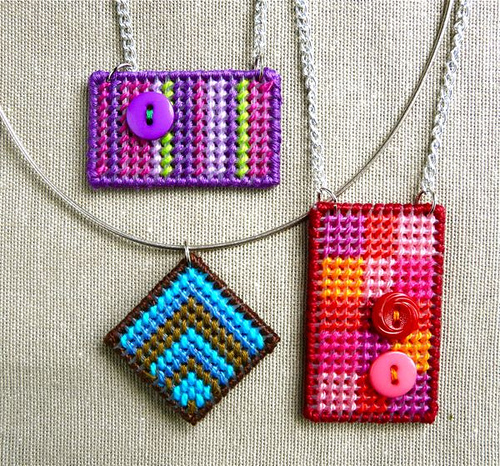
How to Make a Needlepoint Pendant (Yes! With Plastic Canvas!)
I get thousands of emails each week, begging me to offer more plastic canvas coverage on this blog.
(…Okay, well - perhaps that actually happens only in my mind. But still.)
I've been noodling with these needlepoint pendants lately, and liking both the process and finished product. They make up quickly, and use up odds and ends of embroidery floss. Plastic canvas makes a great base for these, because it adds a "heft" that helps the pieces drape well.
Also, it's plastic canvas.
But not just any old plastic canvas!
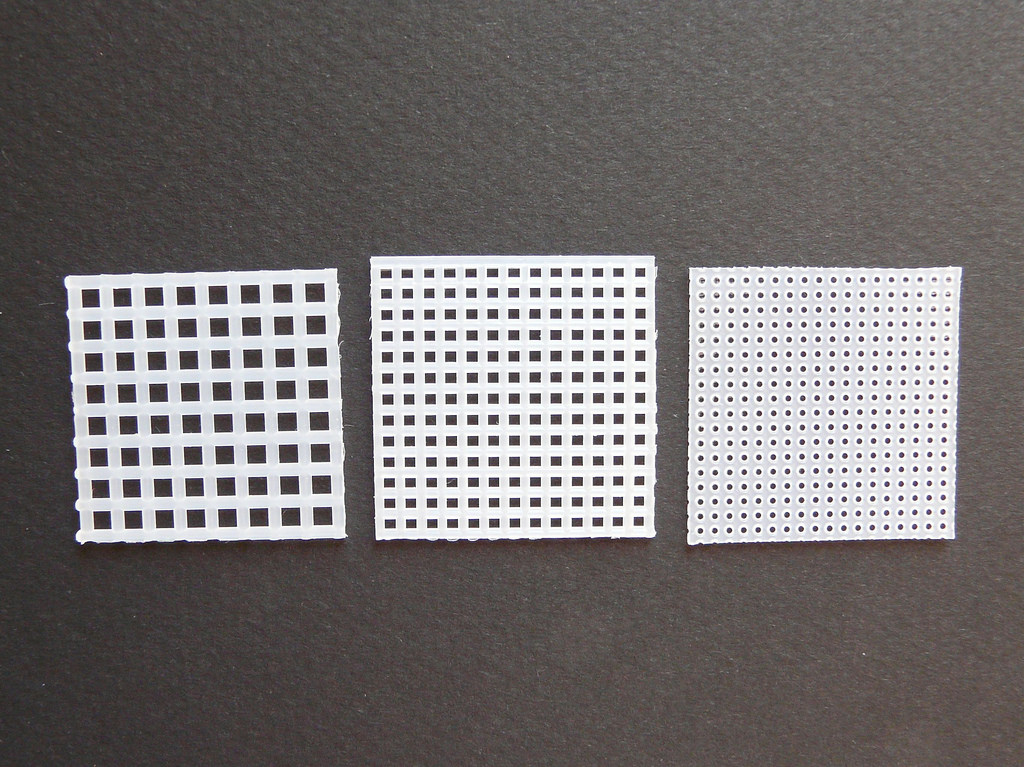
I used 10-count PC for this project, which is a different animal from the bigger 7-count stuff you usually see at your local craft store. (In the photo above, it's the stuff in the center. The "count" refers to the number of squares per inch, by the way.) 10-count has a finer finish, which takes very nicely to six-strand or pearl cotton embroidery floss.
If you can't find 10-count canvas locally, you can get it online. It's great stuff! (If you're curious, the canvas on the right is 14-count. I've made little gift boxes with it.)
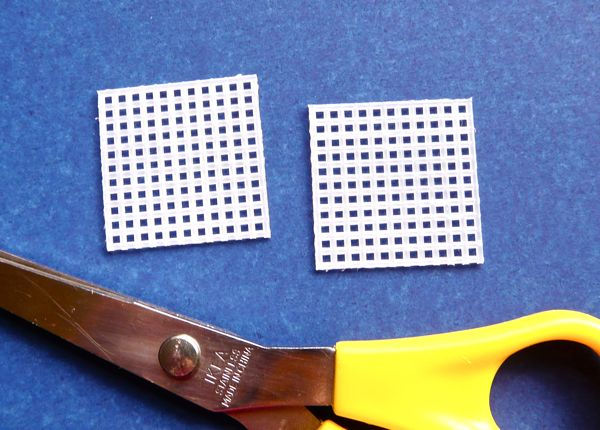
…So, to begin your pendant, cut two same-size pieces of canvas. You can make them any size and shape you like. You may have a specific needlepoint design in mind - and in that case, you'd want to count the number of squares you'll need as you're cutting the canvas.
Or, you can take my patented lazy approach, and just cut a shape and figure out the needlepoint later.
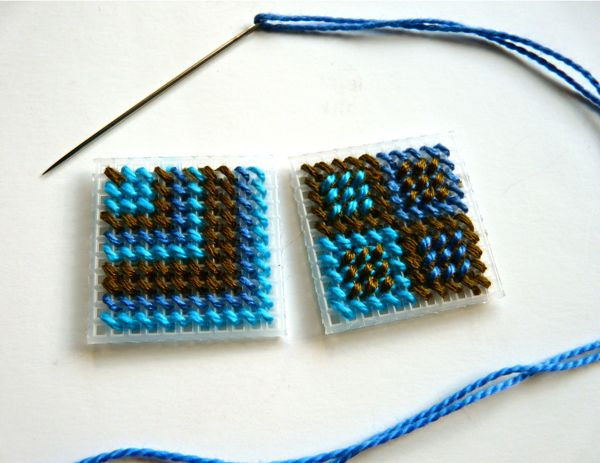
Then, stitch both pieces. I like to stitch them differently, so my pendants are reversible, but you can also make them identical. I'm using a crewel needle here, because it fits nicely through the canvas holes, and a single strand of pearl cotton. If you're using six-strand floss, just use all six strands.
I'm using good old Continental stitch and just playing with colors, but remember - there are so many interesting needlepoint stitches in the world! These are tiny blank canvases - so have fun!
(Incidentally, if you want to sew buttons or sequins to your pendant, this is the time to do that, too.)
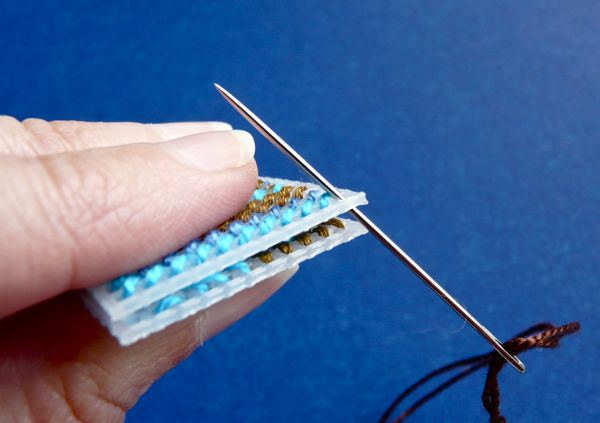
Now, we'll stitch the two pieces together. Place them so the right sides are facing out. Thread your needle with a double strand of floss - it provides better coverage at the edges than a single strand.
Pass the needle up through the top layer of canvas only, as shown.
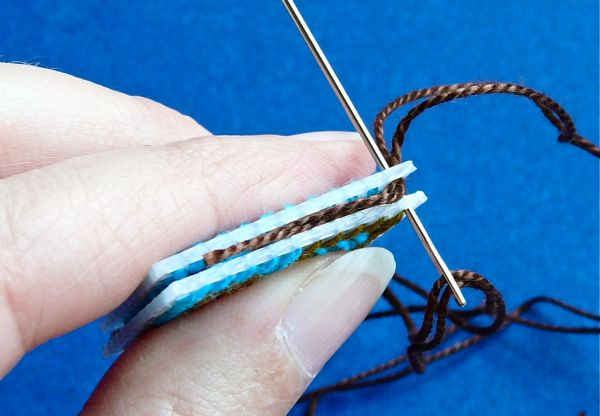
Pull the needle through until you have about 1" of floss. Lay this between the two pieces of canvas, as shown. Then take your next stitch by passing the needle up through both layers of canvas together.
Repeat this stitch to cover the edges of the canvas. (It's called a whip stitch, by the way.) As you stitch, catch that tail of floss in your stitches, as shown here.
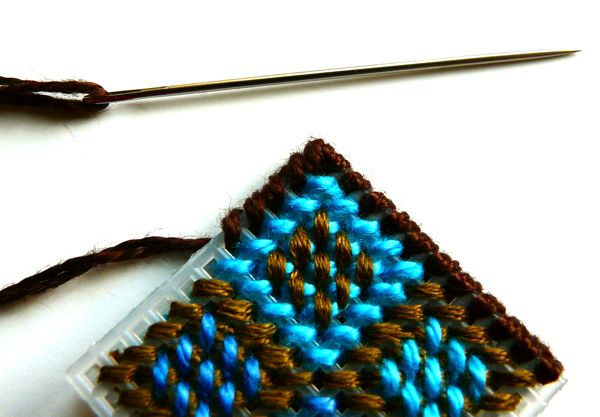
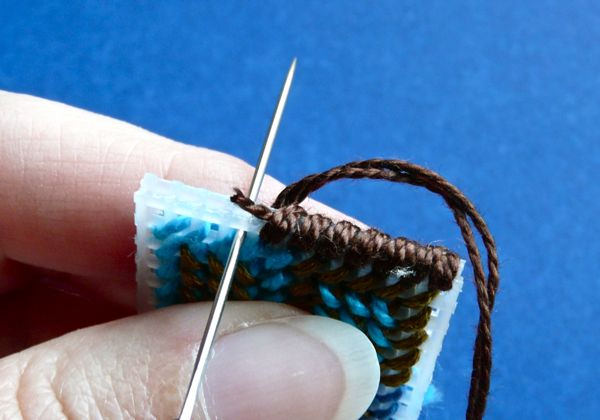
Stitch your way around the pendant. To fully cover each corner, take three stitches in the corner hole.
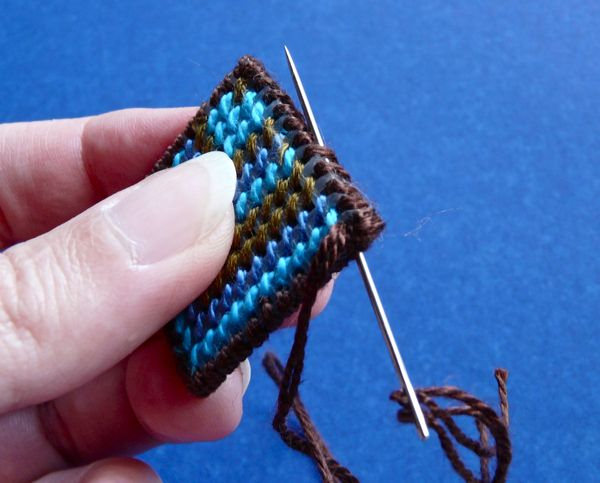
When you've stitched all the way around the pendant, it's time to finish off your floss. To do this, pass your needle carefully between the two layers of canvas, and back out the side, as shown here.
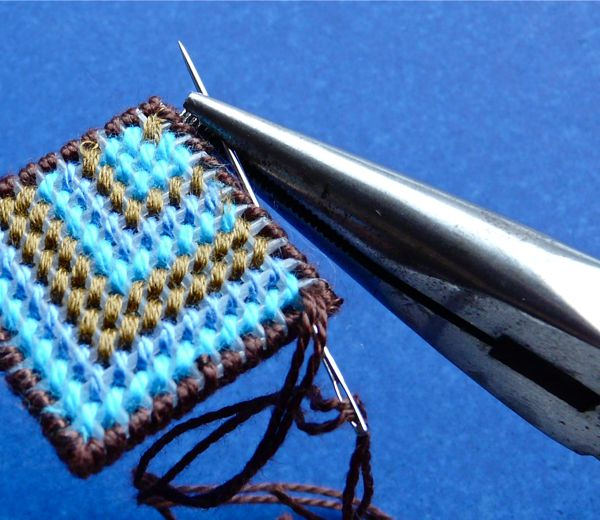
Use a pair of needle-nose pliers to pull the needle and floss through. Seriously, you'll need the pliers. Unless you possess super-human strength.
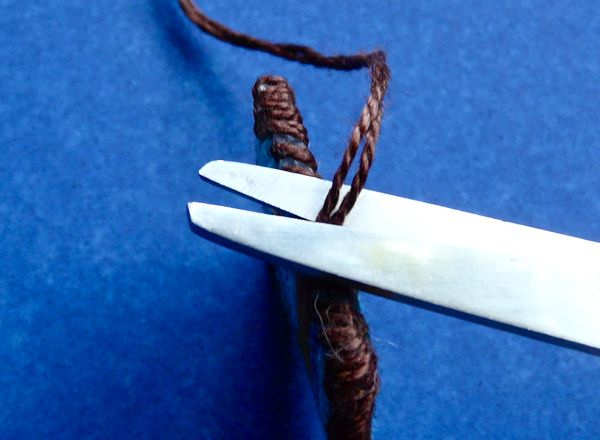
Clip the excess floss close to the edge of the pendant.
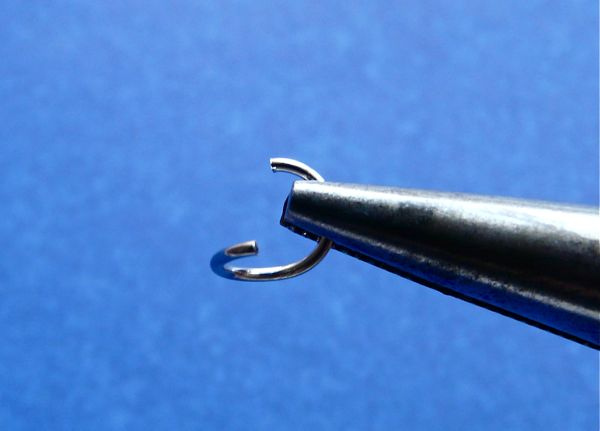
Get a nice, big jump ring, like a 7mm or 8mm. This is the proper way to open a jump ring - you twist it open a bit.
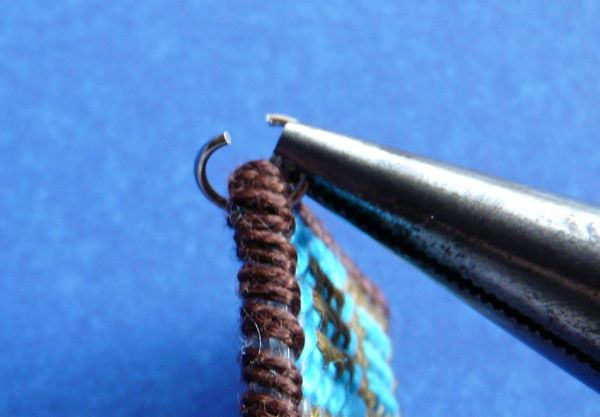
Carefully feed the jump ring through the canvas - pliers are helpful here, too.
If you want your pendant attached to a chain, you can also feed the chain link onto the jump ring now.
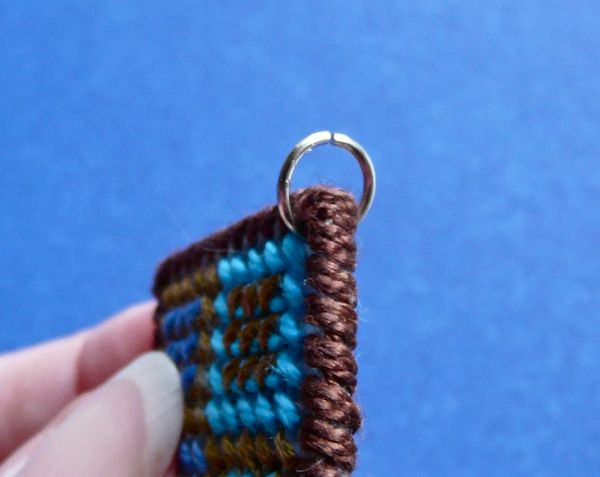
Then, close the jump ring. (Here's how, if you aren't familiar.)
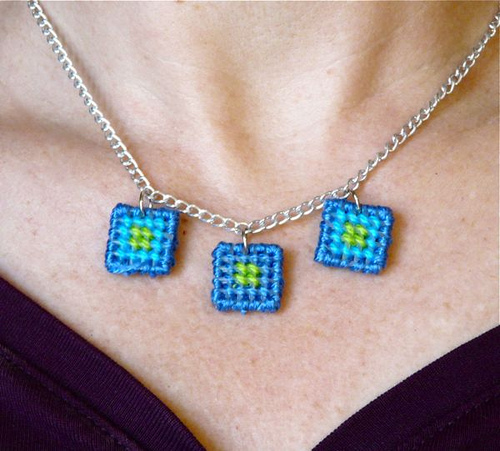
…And you're done!
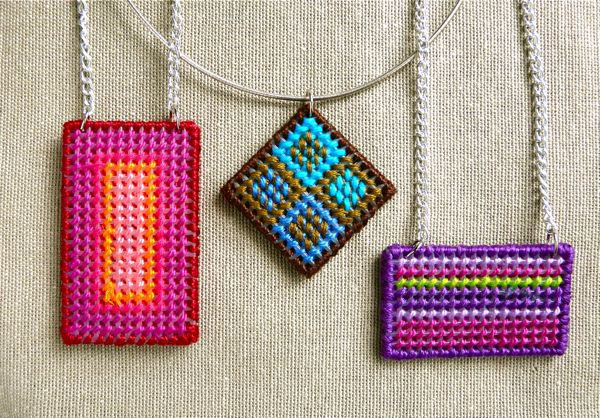
I'm thinking these have some interesting mixed-media possibilities, because you can add buttons and beads easily, or embroider on top of the needlepoint. You could even applique some fabric over the needlepoint. Heck, you could even try stamping or painting over it.
If you make one of these, I'd love to add a photo of it to the CraftyPod Flickr group! Just email me or comment here, won't you?

![[Valid RSS]](../../../sites/files_cp7/valid-rss.png "Validate my RSS feed")
Comments
Those are ridiculously cute! I love them! Thanks so much for the how-to, I'll be linking. This would be so much for for craft night!
Awesome tute! Thanks so much for posting it. I do believe I'm going to have to click that link above for purchasing the plastic canvas (not sure I've ever seen it at my local craft store) ;-)
I really do like these little pendants Diane, and you've done so well with your colour combinations too. Who'd have thunk something made from the "lowly"(oops, bite my tongue! ;)) plastic canvas could look so lovely? Don't think I can think of it in those terms anymore, can I?
You know I can see pendants etc made in different shapes here too. One could trim corners to round them out a bit, or cut bits out of each side to make an interesting shape!! Like I've got time to start with another type of craft! lol.
Yaaaaaay! I'm so glad you had fun with this one. It really is a great way to use up bits of floss. If you feel like sharing, several people have added photos of their pendants to the CraftyPod Flickr group: http://www.flickr.com/groups/1300628@N20/pool/ I'd love to see what you made!
I made one for myself completely different on both sides but it was so much fun I can totally see me using up my stash of floss on some more gorgeous needlepoint pendants. Thank you for being such an amazing source of crafty inspiration.
I stumbled across this late last night trying to find inspiration for new craft items and immediately fell in love with these! Sadly I had no 10 count and a limited amount of embroidery thread and figured i'd go buy some next time i managed to get out. Low and behold my boyfriend shows up today with a bag full of craft items that a woman posted on free cycle. among the misc. items was a half inch stack of 10 count canvas and enough embroidery thread to choke a horse! - I'm WAY excited to make a few of these, it's like it was meant to be!
HAHA! Clearly, meant to be! If you want to, I'd love it if you shared your finished creations in the Flickr group.
Sometimes, you'll need to double your strand of floss to get good coverage. At most Michael's stores, you'll find six-strand floss (which is often in the proce range you mentioned) and pearl cotton. I usually use the pearl, as it's a bit thicker. But just double up your six strand, and you should be fine! Happy Stitching!
So you just use regular embroidery floss like you use for friendship bracelets? I started something the other day, and it seems like it wasn't covering up much of the canvas. Am I just being too impatient by not waiting for the finished piece? I'm using 10 count canvas (had to order online) and the embroidery floss that usually costs about 35 cents a piece at Michael's. Your thread just looks thicker!
I haven't tried this, but if you do, I'd love to know what your results are!
Can your pendant creations be modge podge-d for a hardened and glossy look?
Pages